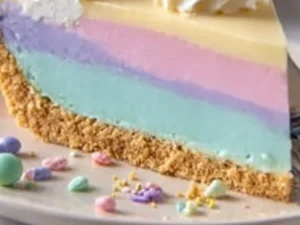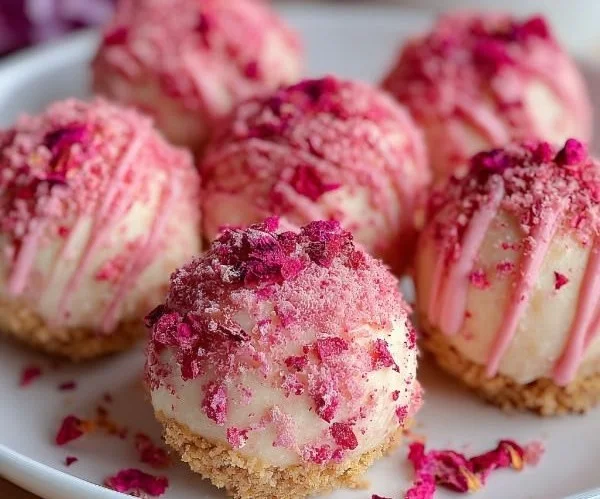
There’s something magical about the colors of springtime, and it just takes a little nudge to draw me back to those sunlit afternoons in my grandmother’s kitchen. I remember the first time I encountered No-Bake Pink Velvet Cheesecake Bites. I was hosting a small gathering, filled with laughter and the scent of freshly pulled tea cakes wafting through the air. I wanted something decadent and fun, something that would spark joy and remind everyone of those blissful childhood celebrations.
I recall placing those little vibrant bites on a delicate glass platter, their lush pink hues shimmering with a glossy finish. As my guests took their first bites, the room filled with a chorus of “oohs” and “ahhs,” and the smile that stretched across my face mirrored theirs. It wasn’t just about the taste—it was the memories that swirled around each morsel, reminiscent of family gatherings, laughter, and love. These No-Bake Pink Velvet Cheesecake Bites quickly became a staple, not only for their creamy, dreamy texture but for the joy they bring to any occasion. Each sweet, velvety bite ignites a celebration, marking life’s moments big and small.
Flavor and Popularity
The Unique Flavor Profile of No-Bake Pink Velvet Cheesecake Bites
When you take a bite of No-Bake Pink Velvet Cheesecake Bites, you’re greeted with a delightful interplay of flavors that dance on your palate. The combination of rich cream cheese and fluffy whipped cream creates a luxurious base, while the addition of smooth vanilla and the unexpected hint of buttermilk brings a delightful tang that perfectly complements the sweetness. The faint essence of red velvet adds an earthy depth, elevating these bites into a realm of flavorful enchantment.
It’s the bright and happy pink hue that draws people in, but it’s the delightful balance of flavors that keeps them coming back. Each bite melts in your mouth, making it hard to stop at just one. The fun, festive appearance makes these bites a perfect treat for birthdays, holidays, or a casual summer get-together.
Why This Recipe Is a Family Favorite and Crowd-Pleaser
There’s a reason why these No-Bake Pink Velvet Cheesecake Bites have become a family favorite in my household. They’re simple to make, requiring no downtime in the oven—even a novice baker can whip them up with ease! When I bring out this dessert, it feels like showering my family with love, and it never fails to elicit smiles all around.
The versatility of these bites is also noteworthy. You can serve them as is or adorn them with sprinkles, fresh berries, or a drizzle of chocolate, making them customizable for any occasion. I’ve seen them disappear in moments at potlucks and family reunions, leading me to believe that these bites are not just food; they’re small parcels of happiness that spark joy among family and friends.
Ingredients and Preparation
Essential Ingredients and Possible Substitutions
To create your No-Bake Pink Velvet Cheesecake Bites, you will need the following essential ingredients:
- Cream cheese: Softened to achieve that creamy texture.
- Granulated sugar: For sweetness that balances the tang of the cream cheese.
- Whipped topping: This keeps the bites light and airy.
- Buttermilk: It adds a tangy flavor and moisture.
- Vanilla extract: To enhance all the flavors beautifully.
- Pink food coloring: Just enough to achieve that gorgeous blush hue.
- Graham cracker crumbs: For the crust, adding a crunchy texture.
If you’re wondering about substitutions, here are a few suggestions:
- Cream cheese: Use mascarpone for a richer flavor.
- Granulated sugar: You can opt for powdered sugar for a smoother texture.
- Whipped topping: Homemade whipped cream is an excellent alternative if you prefer natural ingredients.
- Buttermilk: Substitute with regular milk mixed with a splash of vinegar if you don’t have buttermilk on hand.
- Graham cracker crumbs: If you’re looking for a gluten-free option, use crushed gluten-free cookies.
Step-by-Step Recipe Instructions with Tips
-
Prepare the crust: In a mixing bowl, combine graham cracker crumbs with a little melted butter and sugar. Press this mixture firmly into the bottom of your bite-sized dessert cups or a tray to form a solid base.
-
Make the filling: In another bowl, beat the softened cream cheese until smooth. Gradually add in the sugar and mix well. Next, incorporate the buttermilk and vanilla extract until blended and creamy.
-
Add the whipped topping: Gently fold in the whipped topping until fully combined, creating a light and airy filling. Don’t forget to add a few drops of pink food coloring until you achieve your desired shade.
-
Fill the crust: Spoon the cheesecake mixture onto the prepared crust and smooth the top with a spatula. Cover the dish with plastic wrap and refrigerate for at least 4 hours, or overnight if possible for the best texture.
-
Serve and enjoy: Once chilled, cut into bite-sized squares or scoop them into individual cups. Optionally, garnish with fresh berries or a dusting of powdered sugar.
For an extra treat, consider drizzling some melted chocolate over the top before serving. It adds a touch of elegance and an irresistible flavor.
Cooking Techniques and Tips
How to Cook No-Bake Pink Velvet Cheesecake Bites Perfectly
The beauty of making No-Bake Pink Velvet Cheesecake Bites lies in their simplicity—no complicated cooking techniques required! However, ensuring that your ingredients are at the right temperature is key. Always allow your cream cheese to come to room temperature for easier blending, as this leads to a smoother filling texture.
Using a fine quality whipped topping will also make a difference in the final product. The airiness of the topping plays a big role in creating the light and fluffy texture we all crave. So, whip your cream until it’s just firm and then gently fold it into the cream cheese mixture to keep that volume intact.
Common Mistakes to Avoid
While creating these delightful bites is pretty foolproof, there are a few pitfalls you’ll want to steer clear of. Over-mixing your filling can lead to a dense texture rather than the intended lightness, so be gentle when combining your ingredients.
Another thing to keep in mind is the chilling time. Don’t be tempted to skip the refrigeration step! Chilling allows the flavors to meld and helps the bites firm up beautifully. If you don’t allow enough time for these little treats to set, they could turn out too runny.
Health Benefits and Serving Suggestions
Nutritional Value of No-Bake Pink Velvet Cheesecake Bites
While they are certainly a treat, you can still indulge with joy knowing that No-Bake Pink Velvet Cheesecake Bites are not the worst choice among desserts when enjoyed in moderation. They offer a delicious dose of calcium and protein from the cream cheese and whipped topping, along with the antioxidant benefits from any fresh fruit you may choose to pair with your bites.
Pair them with a side of fresh fruit, and you’ll have a satisfying dessert that’s not only indulgent but also a bit balanced. Always remember to enjoy sweets like these in moderation and embrace the joy they bring especially made in a loving atmosphere.
Best Ways to Serve and Pair This Dish
These No-Bake Pink Velvet Cheesecake Bites shine on their own, but they love company too! Try pairing them with a chilled glass of sweet tea or a splash of your favorite dessert wine. For a fun twist, serve alongside a scoop of strawberry or vanilla ice cream.
At gatherings, I love to elevate my presentation. Arrange the bites on a lovely platter adorned with vibrant berries, mint leaves, or edible flowers for that pop of elegance. These small tweaks make all the difference in how they’re received, adding to the celebratory spirit of your occasion.
FAQ Section
What type of mushrooms are best for No-Bake Pink Velvet Cheesecake Bites?
While mushrooms don’t play a part in this dessert, feel free to incorporate any of your favorite toppings or garnishes, such as berries or chocolate, for added depth and texture.
Can I use dried garlic instead of fresh?
Again, garlic isn’t a component of this sweet treat, but using flavorful toppings like fresh herbs can enhance the presentation and flavor exponentially!
How do I store leftover No-Bake Pink Velvet Cheesecake Bites?
To store your delightful bites, place them in an airtight container in the refrigerator. They’re best enjoyed within 3 to 4 days to maintain their lush texture and freshness.
Can I freeze No-Bake Pink Velvet Cheesecake Bites?
Absolutely! If you’re making these bites in advance, feel free to freeze them. Just ensure they are well-wrapped in plastic and then sealed in an airtight container. When ready to enjoy, allow them to thaw in the fridge for a few hours before serving.
Conclusion
If you’re like me and find joy in creating memories around the table, then you simply have to try making No-Bake Pink Velvet Cheesecake Bites. Each bite offers a touch of nostalgia, a sprinkle of fun, and a whole lot of love. There’s something comforting about sharing a dessert that not only tastes wonderful but brings smiles and warmth to those around you.
Trust me, you’ll want to make this again and again, not just for the flavor but for the shared moments they create. So gather your loved ones, whip up these bites, and let the joy unfold one delicious morsel at a time!
Print
No-Bake Pink Velvet Cheesecake Bites
Delightful no-bake cheesecake bites with a creamy vanilla and buttermilk filling, all wrapped in a graham cracker crust, perfect for any occasion.
- Total Time: 240 minutes
- Yield: 12 servings
Ingredients
- 8 oz cream cheese, softened
- 1/2 cup granulated sugar
- 8 oz whipped topping
- 1/4 cup buttermilk
- 1 tsp vanilla extract
- 1-2 drops pink food coloring
- 1 cup graham cracker crumbs
- 2 tbsp melted butter
Instructions
- Prepare the crust: In a mixing bowl, combine graham cracker crumbs with melted butter and sugar. Press firmly into the bottom of dessert cups or a tray.
- Make the filling: In another bowl, beat softened cream cheese until smooth. Gradually add sugar and mix well, then incorporate buttermilk and vanilla extract.
- Add the whipped topping: Gently fold in the whipped topping until combined, then add pink food coloring until the desired shade is achieved.
- Fill the crust: Spoon the cheesecake mixture onto the prepared crust and smooth the top. Cover with plastic wrap and refrigerate for at least 4 hours.
- Serve and enjoy: Once chilled, cut into bite-sized squares and optionally garnish with fresh berries or powdered sugar.
Notes
For an extra treat, drizzle melted chocolate over the top before serving.
- Prep Time: 15 minutes
- Cook Time: 0 minutes
- Category: Dessert
- Method: No-Bake
- Cuisine: American
- Diet: Vegetarian