There’s something magical about the way aroma fills the kitchen when you bake, isn’t there? I still remember the first time I decided to try my hand at mini cakes. It was a rainy afternoon, and I found myself flipping through my grandmother’s battered old cookbook. The pages were worn thin, but they still held the scent of her lemon zest and vanilla—her little secrets floating around like whispers. The idea of mini cakes thrilled me. They seemed so cute, almost whimsical, like little presents for my loved ones, each one a perfect bite-sized moment of happiness. I could almost hear my grandmother chuckling, encouraging me to unleash my creativity in the kitchen.
As I mixed the flour, sugar, and butter, I felt an invigorating rush of nostalgia. I realized that baking these mini cakes wasn’t just about satisfying a sweet tooth; it was about sharing joy with those around me. Each drizzle of frosting, each sprinkle of edible glitter, transformed these tiny cakes into delicious tokens of love. I’ll never forget how these mini treats became the star of my family gatherings, bringing everyone together in delight and laughter. Over the years, they’ve become a staple, whether celebrating birthdays, welcoming friends, or simply indulging in life’s little moments.
Flavor and Popularity
The Unique Flavor Profile of Mini Cakes
Mini cakes are a canvas for flavor exploration. With their petite size, they pack a punch of taste without overwhelming the palate. Think buttery vanilla, rich chocolate, or even zesty citrus that dances on your tongue. Each bite feels like a delightful burst of joy. You can experiment endlessly! Incorporating bits of fruit or spices can transform your basic batter into something extraordinary. Perhaps stir in some crushed berries or a splash of almond extract for an enchanting twist.
What makes mini cakes truly special is how they cater to diverse taste buds. The fluffy texture makes them incredibly light, allowing people to enjoy multiple flavors in one sitting. They serve as the perfect companion to a cup of tea or coffee, making them wonderful not just for dessert but for afternoon gatherings. Whether you fancy a traditional vanilla mini cake topped with buttercream or crave something adventurous like a spice-infused mini cake decorated with candied ginger, there’s a version for everyone!
Why This Recipe Is a Family Favorite and Crowd-Pleaser
There’s no denying the nostalgic roots of these mini cakes, and that’s why they have nestled themselves into my family’s heart. Mini cakes are not overly sweet; they’re just the right amount of indulgence. Every gathering, be it a festive holiday or a simple Sunday dinner, calls for these little wonders. They ignite joy and conversation around the table.
Everyone in my family has their favorites, and guess what? They’re often asking for variations! My son loves the chocolate chip mini cakes topped with a generous layer of cream cheese frosting, while my daughter swears by the lemon mini cakes adorned with fresh berries. These culinary requests keep our family traditions alive, as we gather in the kitchen to whip up new recipes. It’s a delightful bonding experience, filled with laughter and plenty of taste-testing along the way. Just imagine the scene: flour dust in the air, children giggling, and the oven buzzing with warmth—it’s heartwarming to know that these mini cakes play a role in creating lasting memories.
Ingredients and Preparation
Essential Ingredients and Possible Substitutions
To make delightful mini cakes, you’ll want to gather a few essential ingredients. Here’s what you’ll need:
- All-purpose flour: The base of your mini cakes, providing structure. If you’re seeking a gluten-free option, almond or coconut flour works beautifully.
- Granulated sugar: To sweeten and balance out flavors. You can swap it with coconut sugar for a more earthy sweetness.
- Eggs: These bind everything together and create that lovely fluffiness. For a vegan alternative, use flaxseed meal or unsweetened applesauce.
- Butter (or oil): This adds richness and moisture. Opt for unsalted butter for a classic flavor or try coconut oil for a tropical twist.
- Baking powder: This is your leavening agent that ensures those cakes rise to perfection.
- Vanilla extract: For that warm, comforting aroma. Don’t shy away; it plays a vital role in crafting delicious cakes.
- Milk (dairy or non-dairy): This helps to achieve the right batter consistency. Almond milk or oat milk are great substitutes.
- Optional add-ins: Chocolate chips, crushed fruit, nuts, or spices can elevate your mini cakes into something truly unique!
Step-by-Step Recipe Instructions with Tips
-
Preheat your oven to 350°F (175°C). This step is crucial for getting your cakes to rise beautifully!
-
Prepare your baking tin: Grease your mini cake pans or line them with parchment paper. This helps prevent sticking.
-
In a large mixing bowl, whisk together the dry ingredients: flour, sugar, and baking powder. Make sure to incorporate well to avoid clumping!
-
In another bowl, mix the wet ingredients: beat the eggs, melt the butter, and add milk and vanilla extract. Stir until combined.
-
Gradually fold the wet ingredients into the dry. This gentle action keeps the batter light and airy. If you’re adding any optional ingredients, like chocolate chips or nuts, gently fold them in at this stage.
-
Spoon the batter into your prepared mini cake pans. Fill them about two-thirds full to give the cakes room to rise.
-
Bake for 15-20 minutes, or until a toothpick inserted comes out clean. Avoid opening the oven door prematurely; you want to keep that heat in!
-
Once baked, allow the mini cakes to cool for a few minutes, then gently remove them from the pans. Place them on a cooling rack to cool completely.
-
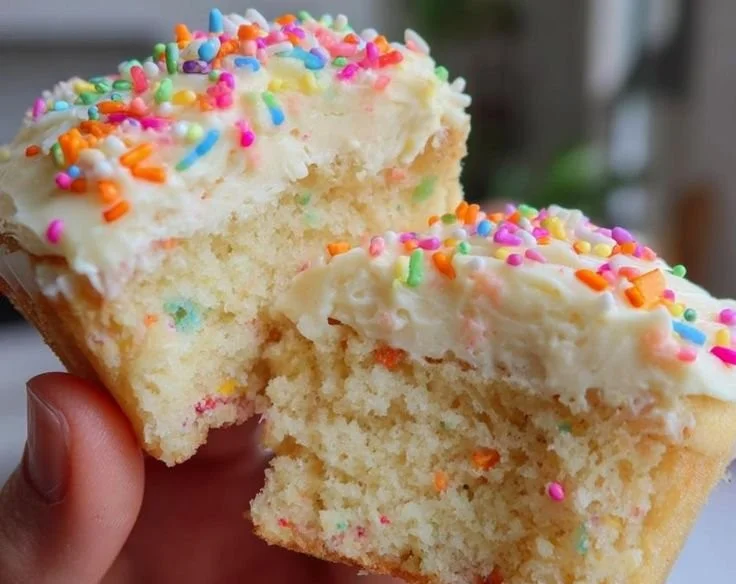
Frost with your favorite icing once cooled, and feel free to add garnishes like fresh berries, nuts, or an edible flower for a beautiful presentation.
My tip? Always taste your batter before baking; that little sample will make you beam with delight!
Cooking Techniques and Tips
How to Cook Mini Cakes Perfectly
Cooking mini cakes may seem straightforward, but little nuances can make a significant difference in the final product. Ensuring that all your ingredients are at room temperature allows for better mixing and a fluffier texture. Be careful not to overmix the batter; gentle folding is essential for maintaining the airiness.
Keep in mind that not ovens heat equally. Check on your cakes a few minutes before the timer goes off. You can tell they’re done when they spring back when lightly pressed.
Common Mistakes to Avoid
One prevalent mistake is using stale ingredients, especially baking powder. Always check the expiration dates for peak freshness. Overbaking can lead to dry cakes; err on the side of caution and watch them closely. Another common error? Skipping the cooling process. I understand the temptation to frost warm cakes, but patience is key to having frosting that stays beautifully intact instead of melting everywhere.
Health Benefits and Serving Suggestions
Nutritional Value of Mini Cakes
While mini cakes are often seen as a treat, they can be tailored to fit healthier lifestyles! By substituting ingredients like using whole grain flour or adding vegetables like grated carrot or zucchini, you can boost those nutritional values. They make a delightful compromise between satisfying sweet cravings and maintaining a balanced diet, especially when served alongside fruit or yogurt.
Best Ways to Serve and Pair This Dish
I adore serving mini cakes with fresh fruit for a double dose of sweetness. Imagine a platter of mini lemon cakes dusted with powdered sugar, seated beside a bowl of mixed berries or a spoonful of creamy whipped yogurt—pure bliss! They’re also wonderful alongside afternoon tea or coffee.
For parties, consider cutting them into even smaller bites and arranging them on a tiered stand for an elegant display. Your guests will be enchanted, and they’ll appreciate having just the right-sized nibble to accompany their conversations.
FAQ Section
What type of mushrooms are best for Mini Cakes?
While mushrooms aren’t typical for sweet mini cakes, incorporating them into savory versions can be delightful. Earthy and umami-rich varieties like shiitake or cremini would work beautifully, adding depth and richness to your cake.
Can I use dried garlic instead of fresh?
Absolutely! Dried garlic can provide a potent flavor. However, since fresh garlic is more pungent, be sure to adjust the amounts to ensure you don’t overwhelm your mini cakes.
How do I store leftover Mini Cakes?
After allowing your mini cakes to cool completely, store them in an airtight container at room temperature for up to three days. For longer storage, the fridge is ideal; just ensure they’re tightly sealed to maintain moisture.
Can I freeze Mini Cakes?
Yes, mini cakes freeze wonderfully. Wrap each cake in plastic wrap and then place them in a freezer-safe bag. They can last up to three months frozen. When you’re ready to enjoy, let them thaw at room temperature before frosting.
As I look back on my culinary adventures, I find endless joy in making mini cakes. They encapsulate memories, love, and the warmth of family gatherings. If you’re like me and cherish those simple moments that bring a smile to your face, you should definitely try out this recipe. There’s something comforting about creating these little delights, knowing they’ll be shared with others. Trust me, you’ll want to make this again and again. Happy baking!
Print
Mini Cakes
Delightful mini cakes that are perfect for any occasion, encapsulating nostalgia and joy in every bite.
- Total Time: 35 minutes
- Yield: 12 mini cakes
Ingredients
- 1 ½ cups all-purpose flour
- 1 cup granulated sugar
- 2 large eggs
- ½ cup unsalted butter, melted
- 2 tsp baking powder
- 1 tsp vanilla extract
- ½ cup milk (dairy or non-dairy)
- Optional add-ins: chocolate chips, crushed fruit, nuts, or spices
Instructions
- Preheat your oven to 350°F (175°C).
- Prepare your baking tin by greasing or lining with parchment paper.
- In a large mixing bowl, whisk together the dry ingredients: flour, sugar, and baking powder.
- In another bowl, mix the wet ingredients by beating the eggs, melting the butter, and adding milk and vanilla extract.
- Gradually fold the wet ingredients into the dry ingredients.
- Spoon the batter into prepared mini cake pans, filling them about two-thirds full.
- Bake for 15-20 minutes, or until a toothpick comes out clean.
- Allow the mini cakes to cool for a few minutes before removing from the pans.
- Frost with your favorite icing once cooled and garnish as desired.
Notes
Always taste your batter before baking for extra delight!
- Prep Time: 15 minutes
- Cook Time: 20 minutes
- Category: Dessert
- Method: Baking
- Cuisine: American
- Diet: Vegetarian