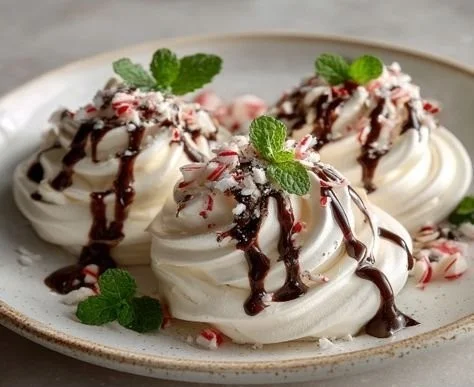
It was a crisp December afternoon in Asheville, the kind where the mountain air bites just enough to remind you that winter was closing in fast. I can still remember the chatter of my family filtering through the kitchen door while I stood by my grandmother’s side, the soft, fluffy clouds of what would become my favorite holiday treat began to take shape. Peppermint Meringues. As she whipped the egg whites, they transformed from clear to glossy peaks of pure magic. The room filled with the sweet and refreshing scent of peppermint, a fragrance so nostalgic it made my heart swell with warmth and joy.
My grandmother always had a way of making the simplest recipes feel like a celebration. Those Peppermint Meringues were light as air, their crisp exterior giving way to sweet, melt-in-your-mouth goodness. With each batch we made, they brought our family together around the table, and memories were woven into their very fabric. I could hardly wait for their delicate crunch paired with a hot cup of cocoa — a moment worth savoring. Sharing this recipe today feels almost like sharing a piece of my heart.
Flavor and Popularity
The Unique Flavor Profile of Peppermint Meringues
Peppermint Meringues stand out not just for their visual appeal but also for their unique flavor. The combination of light, airy sweetness with a refreshing minty zing creates a delightful experience that dances on your palate. This flavor is perfect for the holiday season and makes for an unexpected treat any time of the year.
The sweetness of sugar balances beautifully with peppermint extract, capturing the essence of winter in each bite. These meringues are not overly heavy—which can sometimes accompany richer desserts—allowing you to enjoy them without feeling weighed down. Their crisp texture adds a fun complexity, making them perfect for elevating any dessert table.
Why This Recipe Is a Family Favorite and Crowd-Pleaser
For us, Peppermint Meringues have become a symbol of love and tradition. They are the kind of treat that not only satisfies a sweet tooth but also adds a touch of elegance to any occasion. With minimal ingredients and a straightforward process, this recipe has transcended generations in our family.
Whether my nieces and nephews are fighting to grab a meringue or guests at our holiday parties are clamoring for the last one, the charm of these delicate treats never diminishes. Their vibrant color begs you to take a bite, and once you do, you’re met with a whisper of nostalgia. You see, every bite of Peppermint Meringues comes steeped in laughter, shared moments, and love—elements that define our gatherings.
Ingredients and Preparation
Essential Ingredients and Possible Substitutions
To create Peppermint Meringues that will leave everyone reaching for more, you’ll need to gather just a handful of essential ingredients:
- Egg whites: The base of the meringue, providing structure and volume. Room temperature egg whites whip better.
- Granulated sugar: This fine sugar is essential for creating that glossy sheen while stabilizing the meringue.
- Peppermint extract: Adds the unmistakable mint flavor. Be sure to choose high-quality extract for the best results.
- Cream of tartar: This acts as a stabilizer, helping the egg whites achieve their full volume and maintain shape.
- Food coloring (optional): A drop or two of red or green will add some festive fun to your Peppermint Meringues.
If you’re missing cream of tartar, a splash of white vinegar can serve as a suitable substitute. You can also experiment with different flavor extracts, like vanilla or almond, but keep in mind that they’ll alter the classic peppermint profile.
Step-by-Step Recipe Instructions with Tips
Making Peppermint Meringues is easier than you might think, and with a few careful steps, you’ll master this art in no time.
-
Prep your oven: Preheat your oven to 200°F (93°C). Use parchment paper to line a baking sheet. This will ensure meringues do not stick and are easy to remove later.
-
Whip the egg whites: In a clean, dry bowl, using an electric mixer, start beating your egg whites on low speed until they become foamy. Gradually increase to medium speed.
-
Add cream of tartar: When the egg whites begin to form soft peaks, add the cream of tartar, and continue mixing until incorporated.
-
Add sugar gradually: Slowly add in the granulated sugar, about a tablespoon at a time, while continuing to whip the egg whites. This process should take about 8-10 minutes. When finished, the mixture should be glossy, and peaks should stand stiff when you remove the whisk.
-
Flavor it up: Now stir in the peppermint extract and food coloring, if using, until evenly combined.
-
Pipe the meringue: Spoon the mixture into a piping bag fitted with a star tip (or simply use a plastic bag with the tip cut off). Pipe small rounds onto your prepared baking sheet, leaving space between for each, as they’ll expand slightly.
-
Bake: Place the meringues in the oven. Allow them to bake for 1.5 to 2 hours, or until they feel dry to the touch. Turn off the oven and let them cool inside—this helps prevent cracks.
-
Storing your meringues: Once cooled, store them in an airtight container at room temperature. Enjoy within a week for the best texture and flavor.
Cooking Techniques and Tips
How to Cook Peppermint Meringues Perfectly
Achieving the perfect Peppermint Meringues is all about patience and attention to detail. One of the biggest keys is ensuring that your mixing bowl and beaters are completely free of grease or oil, as this can inhibit the egg whites from whipping properly. Make sure to use fresh ingredients, and room temperature eggs whip better than cold ones.
Additionally, it’s crucial to bake them at a low temperature to ensure that they dry evenly without browning. Letting them cool in the oven is essential for achieving that light, crispy texture that melts in your mouth.
Common Mistakes to Avoid
While making Peppermint Meringues is pretty straightforward, there are a few common pitfalls to watch out for:
- Over-whipping the egg whites: This can lead to a curdled texture. Stop whipping once stiff peaks form but before the mixture looks dry.
- Humidity: Meringues are best made on dry days. Humidity can make them sticky and prevent them from achieving that lovely crispiness.
- Storing incorrectly: After baking, allow them to cool completely, and store them in a cool, dry place.
Health Benefits and Serving Suggestions
Nutritional Value of Peppermint Meringues
When it comes to sweet treats, Peppermint Meringues offer a lighter alternative compared to many desserts. They are low in fat due to using egg whites and are gluten-free. By incorporating pure peppermint extract, you not only enjoy a delightful flavor but also a touch of potential digestion support.
While they do contain sugar, enjoying meringues in moderation can fit into a balanced diet. You can also play around with reducing the sugar slightly without sacrificing too much of the texture—it’s all about finding that perfect balance that works for you.
Best Ways to Serve and Pair This Dish
Peppermint Meringues shine on their own, but they can also be a delightful addition to other desserts. Here are a few serving suggestions:
- Cocoa Delight: Serve alongside a steaming cup of hot cocoa. Their lightness complements the rich texture while the peppermint flavor enhances the overall chocolate experience.
- Dessert Table Showstopper: Use them to top a pavlova or serve as a whimsical decoration on cakes or cupcakes.
- Festive Affaire: For holiday gatherings, create a stunning dessert platter featuring Peppermint Meringues alongside dark chocolate pieces and seasonal fruit.
Their delicate nature makes it easy to incorporate them into any festive spread, adding visual appeal and a burst of taste.
FAQ Section
What type of mushrooms are best for Peppermint Meringues?
It seems there might be a little confusion here! Peppermint Meringues don’t actually contain any mushrooms. They’re a delightful dessert made primarily of egg whites, sugar, and peppermint extract, resulting in a light treat that embodies the spirit of the holidays.
Can I use dried garlic instead of fresh?
Once again, Peppermint Meringues are not meant to include garlic or savory flavors. Their focus is purely on the sweet and fresh complement of peppermint flavors.
How do I store leftover Peppermint Meringues?
To keep your meringues fresh, store them in an airtight container at room temperature. If stored correctly, they can last up to a week. Avoid refrigerating them, as the moisture can alter their delightful texture.
Can I freeze Peppermint Meringues?
Yes, you can freeze Peppermint Meringues! Just ensure they are completely cooled before transferring them to an airtight container or freezer-safe bag. They can be frozen for up to three months. When you’re ready to enjoy, simply let them come to room temperature.
Conclusion
If you’re like me, there’s something soothing about spending time in the kitchen, blending ingredients and creating memories with each dish. Making Peppermint Meringues is not just about the delightful end product; it’s about embracing tradition and sharing joy through food. Trust me, you’ll want to make this recipe again and again. They light up any occasion, spark conversation, and leave your loved ones smiling. So roll up those sleeves, and let your inner baker shine bright — your Peppermint Meringues are waiting to bring warmth and cheer!
Peppermint Meringues
Light and airy Peppermint Meringues, perfect for holiday festivities and a delightful sweet treat anytime.
- Total Time: 105 minutes
- Yield: 12 servings
Ingredients
- 3 Egg whites (room temperature)
- 1 cup Granulated sugar
- 1 tsp Peppermint extract
- 1/4 tsp Cream of tartar
- Food coloring (optional)
Instructions
- Preheat oven to 200°F (93°C) and line a baking sheet with parchment paper.
- In a clean bowl, beat egg whites on low speed until foamy, then increase to medium speed.
- Add cream of tartar when soft peaks form, and mix until incorporated.
- Gradually add sugar, one tablespoon at a time, while whipping until glossy and stiff peaks form (about 8-10 minutes).
- Stir in peppermint extract and food coloring if using until combined.
- Spoon mixture into a piping bag and pipe small rounds onto the parchment-lined baking sheet.
- Bake for 1.5 to 2 hours or until dry to the touch. Turn off oven and let cool inside.
- Store in an airtight container at room temperature for up to a week.
Notes
Use fresh, room temperature eggs for better volume. Avoid humidity while making meringues.
- Prep Time: 15 minutes
- Cook Time: 90 minutes
- Category: Dessert
- Method: Baking
- Cuisine: American
- Diet: Gluten-Free