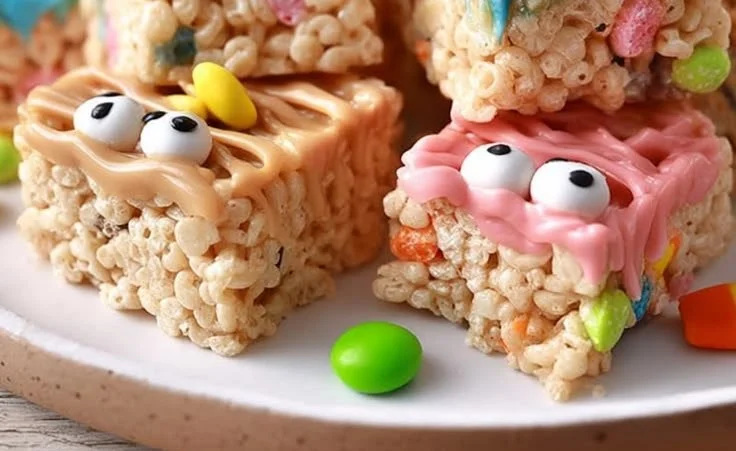
There’s a whimsical magic that comes with the first gooey bite of a Monster Rice Krispie Treat. I remember the first time I whipped up a batch of these colorful delights in my cozy kitchen in Asheville. It was a sunny Saturday afternoon, and the aroma of melting marshmallows filled the air, enveloping me in childhood memories and enticing sweet dreams. With each stir of buttery goodness and the vibrant confetti of sprinkles, it felt as though I was channeling the spirit of my grandmother, who taught me that cooking is not just about sustenance but about joy and togetherness.
In our family, Monster Rice Krispie Treats became an instant hit during gatherings and spontaneous celebrations alike. I loved watching the children’s faces light up as I presented my towering, rainbow-hued creation, a delightful spectacle that beckoned them over. Each hefty square hinted at adventure, wrapped in layers of marshmallow fluff and crispy cereal. It wasn’t merely a dessert; it was a shared experience, a moment of unbridled happiness that united us all. As I cut the squares and they tumbled onto plates, laughter echoed around the house, reminding me that food is a bridge—connecting hearts and creating memories that linger long after the last crumb is gone.
Flavor and Popularity
The Unique Flavor Profile of Monster Rice Krispie Treats
Monster Rice Krispie Treats steal the show not just with their vibrant appearance but with their delightful textural contrast. There’s something remarkably satisfying when you bite into that fluffy marshmallow, which then yields to the satisfying crunch of puffed rice. Combined with a touch of butter, these ingredients create a luxurious blend that is both nostalgic and novel. The playful addition of fun-sized candies and colorful sprinkles introduces an unexpected explosion of sweetness and texture that makes each bite utterly irresistible.
When you’re digging into one of these treats, you’ll experience sweet caramel notes from the melted marshmallows mingling with buttery goodness. The balance of flavors creates a nostalgic yet innovative dessert that everyone loves, young and old alike. This isn’t just a treat; it’s an adventure for your taste buds that invites nostalgia while keeping things fresh and exciting.
Why This Recipe Is a Family Favorite and Crowd-Pleaser
The beauty of Monster Rice Krispie Treats lies in their versatility as well as their sheer joy-inducing nature. They are an easy, straightforward treat that doesn’t require fancy gadgets or years of culinary training—which is music to the ears of someone like me. Additionally, these treats allow the involvement of family members of all ages; from the youngest toddler to the most seasoned adult, everyone can join in the fun.
I’ve found that Monster Rice Krispie Treats also serve as an excellent canvas for creativity. You can throw in your favorite candies, nuts, or dried fruits to personalize your treats, ensuring that they cater to everyone’s taste. Whenever I find myself in a pinch for a last-minute treat for a birthday party or a special event, I know these treats will always impress, bringing smiles to faces and warmth to hearts.
Ingredients and Preparation
Essential Ingredients and Possible Substitutions
To prepare your magical Monster Rice Krispie Treats, gather these essential ingredients:
- Rice Krispies: This classic cereal serves as the backbone, providing that unmistakable crunch.
- Marshmallows: Use large marshmallows for perfect melting or mini marshmallows for convenience.
- Butter: A generous amount of butter adds richness and helps to bind everything together.
- Milk Chocolate and Colored Candy: Thinly chopped chocolate bars or your favorite candies add character and sweetness.
- Sprinkles: Rainbow sprinkles are traditional, but feel free to use themed ones for holidays or special events.
If necessary, you can make some substitutions. For a twist on flavor, try using flavored marshmallows or even a sprinkle of cocoa powder for a chocolaty twist. You can also swap the Butter for margarine if you prefer a dairy-free option. If Rice Krispies aren’t available, any similar puffed cereal can work in a pinch.
Step-by-Step Recipe Instructions with Tips
Making Monster Rice Krispie Treats is as simple as 1-2-3. Here’s how to create your masterpiece:
-
Prep the Baking Dish: Start by greasing a 9×13-inch pan with butter or non-stick spray to prevent the treats from sticking.
-
Melt the Ingredients: In a large saucepan over low heat, melt the butter, stirring gently until it’s fully melted. Add your marshmallows (all at once for maximum fluffiness). Stir continuously until they’re completely melted and smooth.
-
Combine and Fold: Remove the pan from heat and mix in the Rice Krispies, folding gently so every puff is nicely coated. Add in optional mix-ins like candy or sprinkles before transferring to the baking dish.
-
Spread and Set: With a buttered spatula (or clean hands), press the mixture evenly into the pan. Let it set at room temperature for at least an hour.
-
Cutting and Enjoying: Once set, slice into squares using a sharp knife. For extra fun, you can drizzle more melted chocolate over the top.
Here’s a tip: Avoid packing them too tightly; you want a chewy texture instead of a dense brick.
Cooking Techniques and Tips
How to Cook Monster Rice Krispie Treats Perfectly
Cooking these treats perfectly is all about maintaining a delicate balance. Avoid using high heat when melting the butter and marshmallows; doing so can turn your mixture grainy. Stir gently, being sure to coat the crispy rice without crushing them. When pressed into the pan, don’t pack them too tightly, as this will lead to hard treats.
You can enhance your treats by experimenting with flavors—try vanilla, almond extract, or even coconut for an unexpected twist.
Common Mistakes to Avoid
First, never skip greasing your pan; this simple step saves a lot of frustration come serving time. Also, be cautious not to overheat your marshmallows and butter—this can affect both texture and flavor. When incorporating mix-ins like candies, remember to do it gently. If mixed too hard, your treats may lose their delightful crunch.
Always let the treats cool completely before cutting, as they’ll hold their shape better and make for cleaner slices.
Health Benefits and Serving Suggestions
Nutritional Value of Monster Rice Krispie Treats
While indulging in a sweet treat doesn’t come without its risks, Monster Rice Krispie Treats do provide a sense of joy and nostalgia, which often is just as important as nutritional content. They are a source of carbohydrates, giving you a quick energy boost—a perfect sweet snack post-activity or as a pick-me-up during the day.
Despite the sugar and fat content from butter and marshmallows, sharing these treats reminds us of the bonds forged around the kitchen table, reinforcing the joy of homemade delights.
Best Ways to Serve and Pair This Dish
These treats shine on their own but also pair beautifully with a glass of cold milk, a scoop of ice cream, or even whipped cream on a special occasion. I love to serve them at birthday parties, school events, or just a cozy getaway with family. They bring a celebratory flair to any gathering!
You can also cut them into fun shapes using cookie cutters for holidays or themed events. Just imagine a heart-shaped treat for Valentine’s Day or a pumpkin-shaped one for Halloween!
FAQ Section
What type of mushrooms are best for Monster Rice Krispie Treats?
While mushrooms might seem out of place here, it’s important to clarify that mushrooms don’t belong in Monster Rice Krispie Treats, as they stray from the sweet flavor profile. However, if you are craving a savory twist, you can’t go wrong with the classics—stick to the traditional ingredients for optimal enjoyment.
Can I use dried garlic instead of fresh?
Dried garlic isn’t typically used in Monster Rice Krispie Treats since this recipe focuses exclusively on sweet flavors. For savory recipes featuring garlic, fresh garlic is always preferred to capture that vibrant essence.
How do I store leftover Monster Rice Krispie Treats?
Store any leftovers in an airtight container at room temperature, where they’ll stay fresh for several days. If stored in a cool area, they can maintain that chewy, delightful consistency.
Can I freeze Monster Rice Krispie Treats?
Absolutely! You can freeze your Monster Rice Krispie Treats. Wrap individual squares in plastic wrap or aluminum foil and place them in a freezer-safe bag. They can last up to three months this way. Just remember to let them thaw at room temperature before diving back in.
Conclusion
If you’re like me and wholeheartedly believe in the power of homemade joy, I encourage you to give these Monster Rice Krispie Treats a try. There’s something comforting about creating a treat that holds the potential to spark laughter and joy among family and friends. Trust me, you’ll want to make this again and again, relishing in the process and creating cherished memories with every gooey, delicious bite. Dive in, and let the magic unfold in your kitchen!
Print
Monster Rice Krispie Treats
Delicious and colorful Monster Rice Krispie Treats that are a hit at any gathering, bringing joy and nostalgia with every bite.
- Total Time: 25 minutes
- Yield: 12 servings
Ingredients
- 6 cups Rice Krispies
- 10 oz large marshmallows
- 1/2 cup butter
- 1 cup milk chocolate, thinly chopped
- 1 cup rainbow sprinkles
Instructions
- Prep the baking dish: Grease a 9×13-inch pan with butter or non-stick spray.
- Melt the ingredients: In a saucepan, melt the butter over low heat. Add marshmallows and stir until smooth.
- Combine and fold: Remove from heat, mix in Rice Krispies, and fold in optional candy or sprinkles.
- Spread and set: Press the mixture evenly in the pan and let set for at least 1 hour.
- Cutting and enjoying: Slice into squares and drizzle with melted chocolate if desired.
Notes
Avoid packing the mixture too tightly to maintain a chewy texture.
- Prep Time: 15 minutes
- Cook Time: 10 minutes
- Category: Dessert
- Method: No-Bake
- Cuisine: American
- Diet: Vegetarian