As I stood by the kitchen counter, the afternoon sun pouring in through the window, I felt that familiar wave of nostalgia wash over me. The soft, nutty aroma of the peanut butter mixed with the rich sweetness of chocolate immediately transported me back to my grandmother’s quaint kitchen. It was there, amidst her laughter and warm hugs, that I first encountered the magic of making No-Bake Chocolate Peanut Butter Protein Balls. I can still hear her voice, her smooth Southern drawl wrapping each word in love, encouraging me to dive in and get my hands a little messy.
At the time, I just wanted a quick snack, something sweet and satisfying that wouldn’t keep me tied to the stove for hours. But little did I know, those glossy little balls would come to symbolize so much more. They became an after-school treat for my kids, a secret pick-me-up during long workdays, and even a healthy indulgence to share with friends during evenings on the porch. Each bite delivered a delightful crunch and a burst of chocolatey goodness that made me smile, reminding me of those cherished afternoons spent creating something delicious and wholesome. Today, I want to share that joy with you through this simple and delightful recipe, perfect for any occasion.
Flavor and Popularity
The Unique Flavor Profile of No-Bake Chocolate Peanut Butter Protein Balls
The flavor profile of No-Bake Chocolate Peanut Butter Protein Balls is nothing short of delightful. Imagine the creamy, rich sensation of peanut butter perfectly complemented by the deep, luscious notes of chocolate. Each bite experiences a gentle crunch from the added oats, bringing a satisfying texture that sets these protein balls apart. It’s not just the sweetness that grabs your attention; it’s also the earthy undertones provided by the oats and the natural peanut flavor that make this treat truly irresistible.
The beauty of these bites lies in their simplicity—no complicated steps or obscure ingredients here! You can enjoy the indulgent flavor without the guilt, and that makes them a winner in my book. They can serve as a nutritious post-workout snack, an afternoon pick-me-up, or a dessert that keeps you feeling good while satisfying your sweet tooth.
Why This Recipe Is a Family Favorite and Crowd-Pleaser
What I love most about No-Bake Chocolate Peanut Butter Protein Balls is their versatility. This recipe quickly became a favorite in my home, bringing the whole family together. Whether my kids are racing home from school or I’m entertaining friends on a sunny afternoon, these protein balls always please the crowd. The beauty of this treat is that it’s loved by adults and kids alike, making it a perfect addition to any gathering or a simple family snack.
With so many versions of energy balls out there, I find this one strikes the ideal balance—sweet enough to satisfy but wholesome enough to feel good about! It’s also flexible; feel free to add your favorite mix-ins—perhaps a dash of cinnamon or a handful of mini chocolate chips. That’s another reason these delights became a household staple: they encourage creativity while remaining true to their nourishing roots.
Ingredients and Preparation
Essential Ingredients and Possible Substitutions
To whip up these delectable No-Bake Chocolate Peanut Butter Protein Balls, you’ll need to gather a few essential ingredients. Here’s what you’ll need:
- Peanut Butter: Creamy or crunchy, choose your favorite! Natural options without added sugars or oils work wonders.
- Rolled Oats: These give the protein balls their structure while providing fiber. Quick oats can substitute if you’re short on time.
- Honey or Maple Syrup: A touch of sweetness to bind everything together, offering delightful flavor. Feel free to use agave if you prefer a vegan alternative.
- Chocolate Protein Powder: This ingredient packs an extra punch of protein. However, you can swap it out for cocoa powder if you want to keep things simple and less sweet.
- Mini Chocolate Chips: These add a fun, indulgent touch but can be omitted or replaced with your favorite nuts or dried fruits.
- Vanilla Extract: Just a splash elevates the flavor and rounds out the sweetness.
If you don’t have peanut butter on hand, almond butter or sunflower seed butter can also shine in this recipe, making the dish nut-free and still delicious.
Step-by-Step Recipe Instructions with Tips
Now that you have your ingredients ready, let’s dive into the step-by-step instructions. Trust me, the simplicity of this recipe is one of its biggest charms!
- In a large mixing bowl, combine 1 cup of rolled oats and ½ cup of chocolate protein powder. Stir these dry ingredients together until they’re well mixed.
- Add in ½ cup of creamy peanut butter and ¼ cup of honey (or maple syrup). Don’t be shy—this part is deliciously messy, and, believe me, your hands will enjoy the tactile experience!
- Drizzle in a splash of vanilla extract—about 1 tsp should do the trick—and mix everything until it’s all combined. If your mixture feels a bit dry, a splash of warm water can help bring it all together.
- Now for the fun part! Fold in ¼ cup of mini chocolate chips (or any mix-ins you desire) with love.
- Once thoroughly mixed, use a small ice cream scoop or your hands to form bite-sized balls. Aim for about 1 inch in diameter.
- Place them on a parchment-lined baking sheet. If you feel inclined, you can roll them in shredded coconut or crushed nuts for an extra touch.
- Once you’ve formed all the balls, pop the tray into the refrigerator for about 30 minutes. This helps them firm up beautifully and makes them easier to store.
Once chilled, these No-Bake Chocolate Peanut Butter Protein Balls are ready to enjoy! I love storing them in an airtight container in the fridge, where they’ll stay fresh for up to a week. (Although trust me, they won’t last that long!)
Cooking Techniques and Tips
How to Cook No-Bake Chocolate Peanut Butter Protein Balls Perfectly
The beauty of these No-Bake Chocolate Peanut Butter Protein Balls lies in their simplicity, but a few techniques ensure they turn out just right. Make sure to thoroughly mix the dry and wet ingredients before forming the balls. This will ensure every bite is as flavorful as the last.
Using a cookie scoop can simplify the ball-rolling process; it keeps each one uniform in size for even snacking. Don’t forget to chill them properly! This allows the flavors to meld together while creating that delightful texture you crave.
Common Mistakes to Avoid
A couple of pitfalls to avoid when making these treats include not mixing the ingredients thoroughly—which may lead to dry spots—or being tempted to skip the chilling step. Trust me, if you rush that part, you’ll end up with a sticky mess that won’t hold its shape!
Health Benefits and Serving Suggestions
Nutritional Value of No-Bake Chocolate Peanut Butter Protein Balls
These delightful protein balls are not only tasty but also come packed with essential nutrients. They offer a great balance of protein, healthy fats, and complex carbohydrates, making them perfect for a post-workout snack or a quick breakfast on the go. The oats provide a hearty dose of fiber, promoting digestive health while the peanut butter adds protein and healthy fats that help keep you full.
With their nutritious components, you can feel good sharing these treats with your family. Just one ball can provide a satisfying boost that lasts for hours.
Best Ways to Serve and Pair This Dish
There’s something endlessly satisfying about pairing these No-Bake Chocolate Peanut Butter Protein Balls with a cozy beverage. Consider serving them alongside a glass of almond milk or a warm cup of herbal tea. They’re also heavenly crumbled over yogurt or added into a smoothie for that extra creamy texture!
These protein balls make perfect companions for picnics, lunchboxes, or just enjoying during a quiet moment at home. Serve them with fresh fruit, like apple slices or a banana, for a well-rounded snack. You could even create a fun snack platter when inviting friends over—trust me, they’ll be a hit!
FAQ Section
What type of mushrooms are best for No-Bake Chocolate Peanut Butter Protein Balls?
Interestingly, mushrooms do not play a role in this recipe! However, for those looking to enhance a different dish, consider using cremini or shiitake mushrooms for an earthy flavor.
Can I use dried garlic instead of fresh?
Dried garlic wouldn’t quite fit into this recipe, but if you’re preparing a savory dish that calls for garlic, dried can be a good substitute. Always adjust based on preference and taste!
How do I store leftover No-Bake Chocolate Peanut Butter Protein Balls?
Store these goodies in an airtight container in the refrigerator. They’ll stay fresh for about a week, though I can’t promise they’ll last that long!
Can I freeze No-Bake Chocolate Peanut Butter Protein Balls?
Absolutely! You can freeze these tasty bites for up to three months. Just make sure to wrap them well or place them in a freezer-safe container, so they maintain their flavor and texture.
Conclusion
If you’re like me, you know the joy of having a quick yet delightful snack on hand. These No-Bake Chocolate Peanut Butter Protein Balls bring a smile to my face and heart every time I reach for one. There’s something comforting about knowing you can whip up these treats with just a few ingredients and a bit of love.
Trust me, you’ll want to make this recipe again and again—just like I have through the years. So, don’t hesitate! Step into your kitchen and let those beautiful memories unfold with every ball you create. Happy cooking!
Print
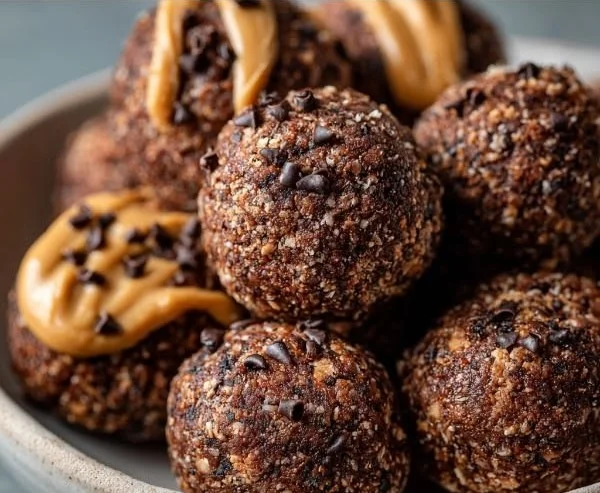
No-Bake Chocolate Peanut Butter Protein Balls
A simple and delightful recipe for No-Bake Chocolate Peanut Butter Protein Balls, perfect for a quick snack or a nutritious dessert.
- Total Time: 15 minutes
- Yield: 12 servings
Ingredients
- 1 cup rolled oats
- ½ cup chocolate protein powder
- ½ cup creamy peanut butter
- ¼ cup honey or maple syrup
- 1 tsp vanilla extract
- ¼ cup mini chocolate chips (optional)
Instructions
- Combine rolled oats and chocolate protein powder in a large mixing bowl.
- Add peanut butter and honey or maple syrup to the dry ingredients.
- Drizzle in the vanilla extract and mix until combined.
- Fold in mini chocolate chips or any mix-ins desired.
- Form bite-sized balls about 1 inch in diameter using your hands or a small scoop.
- Place them on a parchment-lined baking sheet.
- Chill in the refrigerator for about 30 minutes to firm them up.
Notes
Best stored in an airtight container in the fridge for up to a week. Can be frozen for up to three months.
- Prep Time: 15 minutes
- Cook Time: 0 minutes
- Category: Snack
- Method: No-Bake
- Cuisine: American
- Diet: Vegetarian