It was a chilly autumn afternoon when I first decided to create Red Velvet Cheesecake Brownies – a rich and decadent dessert that had intrigued me ever since I spotted a recipe tucked in the back of an old cookbook. The house was filled with the crisp scent of falling leaves outside, mingling with something warm and inviting bubbling away on the stove. Inspired by my grandmother’s tradition of making desserts for our family get-togethers, I felt an overwhelming urge to prepare something that could wrap love in every bite.
As I melted the chocolate and saw the bright crimson batter take shape, I couldn’t help but grin. Memories danced in my mind of summers spent in her kitchen, learning how to blend sweet and savory into something spectacular. I thought back to the first time I tasted red velvet cake— the soft, velvety texture that melted on the tongue, paired perfectly with a slightly tangy cream cheese frosting. This was taking it up a notch. The brownies became the centerpiece of my family’s dessert table at our Thanksgiving gathering that year, and as the rich chocolate-y aroma wafted through the air, I saw faces light up with pure anticipation. These Red Velvet Cheesecake Brownies had quickly turned into more than just a dessert; they had transformed into a shared moment of joy, laughter, and nostalgia, binding us all together in love and sweetness.
Flavor and Popularity
The Unique Flavor Profile of Red Velvet Cheesecake Brownies – Rich and Decadent Dessert
Red Velvet Cheesecake Brownies combine the rich, bold essence of chocolate with a tangy cream cheese swirl. This delightful union creates a unique flavor experience that’s both indulgently sweet and refreshingly tangy. Imagine biting into a brownie that feels like a luxurious hug, where the moist, fudgy chocolate envelops the creamy, luscious tongue of cheesecake. The hint of vanilla extracted from the cream cheese heightens the sweetness without overwhelming the palate, making every bite a dance of flavors worthy of any special occasion.
The addition of cocoa powder gives the brownies a deep and dark richness, while the red food coloring provides that signature hue, capturing attention at any gathering. This striking visual can uplift any mundane dessert table, drawing guests in before they even take a bite, and sparking curiosity. So whether you’re serving it at a family gathering, a holiday celebration, or just because you can, these brownies will captivate your audience, making everyone feel special with each indulgent forkful.
Why This Recipe Is a Family Favorite and Crowd-Pleaser
One of the many reasons this recipe has become a family favorite is its versatility. The richness of Red Velvet Cheesecake Brownies makes them perfect for any gathering, and honestly, who can resist the sight of those beautiful, fudgy, crimson squares? They are easy to prepare, and with a few simple steps, you can create an elegant dessert that rivals anything from a high-end bakery. This dual-layered dessert brings together the joy of brownies with the indulgence of cheesecake, giving everyone that little extra something to savor.
When I first introduced these brownies to my family, I was met with gasps of delight and an immediate "What’s in these?!" from my sons, who are often my toughest critics. The fact that they are both visually stunning and unbelievably tasty has made them a staple at every holiday and special occasion since. There’s a little magic that happens with this recipe—the brownies practically disappear before your eyes! Whether it’s the rich chocolaty flavor or that melt-in-your-mouth creamy cheesecake swirl, everyone leaves the table wanting more.
Ingredients and Preparation
Essential Ingredients and Possible Substitutions
To make Red Velvet Cheesecake Brownies, you’ll want to gather a handful of essential ingredients that create that luxurious dessert experience. Here’s what you’ll need:
- Butter: Use unsalted butter for a rich flavor.
- Granulated Sugar: Sweetens and helps with the texture.
- Brown Sugar: Adds depth and moisture.
- Eggs: Creates an airy texture with structure.
- All-Purpose Flour: Combines with cocoa to form the base.
- Cocoa Powder: Enhances the chocolate flavor.
- Red Food Coloring: Gives those iconic red velvet visuals.
- Vanilla Extract: Essential for flavoring.
- Cream Cheese: The star of the cheesecake layer.
- Powdered Sugar: Sweetens and smoothes the cheesecake mixture.
- Sour Cream: Adds tangy richness to the cheesecake layer.
If you’re looking for substitutions, don’t worry! You can easily adjust a few ingredients:
- Opt for coconut oil instead of butter for a dairy-free option.
- Replace brown sugar with coconut sugar for a more caramel-like flavor.
- Use Greek yogurt in place of sour cream for a lighter take that holds moisture well.
- For a naturally red hue, beetroot powder is a fantastic substitute for red food coloring.
Step-by-Step Recipe Instructions with Tips
Step 1: Preheat Your Oven
Begin by preheating your oven to 350°F (175°C). Grease and line an 8×8 inch baking pan with parchment paper for easy removal of the brownies.
Step 2: Create the Brownie Base
In a medium saucepan, melt the butter over medium heat. Once melted, remove from heat and add both sugars, stirring until well combined. Add the eggs one at a time, mixing thoroughly after each addition. Next, stir in the vanilla extract and red food coloring until you achieve your desired shade.
Step 3: Combine Dry Ingredients
In a separate bowl, whisk together flour, cocoa powder, and a pinch of salt. Gradually fold the dry ingredients into the wet mixture until just combined. Be careful not to overmix; this helps to create the fudgiest texture.
Step 4: Prepare the Cream Cheese Layer
In a mixing bowl, beat the cream cheese until smooth. Add in the powdered sugar, sour cream, and an additional teaspoon of vanilla extract, and mix until creamy and well combined.
Step 5: Assemble the Brownies
Spread the brownie batter evenly into the prepared pan, smoothing it out. Dollop spoonfuls of the cream cheese mixture on top, and then use a knife to swirl it beautifully into the brownie batter.
Step 6: Bake to Perfection
Bake in the preheated oven for about 30-35 minutes or until a toothpick inserted in the center comes out with a few moist crumbs. Be cautious not to overbake as we want to maintain that fudgy texture.
Step 7: Cool and Serve
Once baked, allow the brownies to cool in the pan on a wire rack before lifting them out using the parchment paper. Cut them into squares, and if you can resist, let them chill in the refrigerator for a bit. Trust me; the flavors only get better!
Cooking Techniques and Tips
How to Cook Red Velvet Cheesecake Brownies – Rich and Decadent Dessert Perfectly
Achieving the perfect brownies requires a few gentle techniques. Handle the batter with care; over-mixing will create a denser brownie. If you find your brownies slightly undercooked, that’s fine—remember that they will continue to bake in the pan as they cool! Another tip is to let the dollops of cream cheese sit for a moment at room temperature; it will be easier to swirl this way. When serving, use a warm knife to slice through the brownies for cleaner squares, enhancing that craving-inducing presentation.
Common Mistakes to Avoid
When embarking on your Red Velvet Cheesecake Brownies journey, a few common pitfalls can hinder your results. Avoid the temptation to skimp on quality ingredients; good butter or real vanilla extract can elevate your dish significantly. Another mistake is not letting the brownies cool sufficiently before cutting; this can lead to messy results! Also, always be mindful of oven temperatures; investing in an oven thermometer can ensure accurate baking times for your specific appliance.
Health Benefits and Serving Suggestions
Nutritional Value of Red Velvet Cheesecake Brownies – Rich and Decadent Dessert
While Red Velvet Cheesecake Brownies are certainly an indulgent treat, they can also offer some benefits if enjoyed moderately. The cream cheese used can provide calcium and protein, and the antioxidant-rich cocoa powder brings beneficial effects as well. Making brownies from scratch allows you control over the quality of sugars and fats so you can infuse a little nutrition in sneakily sweet bites!
Best Ways to Serve and Pair This Dish
Serve these decadent treats as they are—simply dusted with a touch of powdered sugar for elegance, or add a dollop of whipped cream or a scoop of vanilla ice cream for extra indulgence. They pair beautifully with a warm cup of coffee or a glass of cold milk, offering that classic comforting combination. For added flair, consider garnishing with fresh raspberries or sprigs of mint for a pop of color!
FAQ Section
What type of mushrooms are best for Red Velvet Cheesecake Brownies – Rich and Decadent Dessert?
Although mushrooms are typically not included in the dessert category, you can enhance the depth of your flavor by adding culinary mushrooms in savory dishes. For Red Velvet Cheesecake Brownies, focus on sweet ingredients, but remember that earthy flavors can work wonders in companion dishes!
Can I use dried garlic instead of fresh?
While garlic is delicious in savory recipes, I recommend avoiding it in sweet desserts. The flavor may conflict with the sweetness of the brownies, so stick to the traditional ingredients for this rich dessert.
How do I store leftover Red Velvet Cheesecake Brownies – Rich and Decadent Dessert?
Store any leftovers in an airtight container at room temperature for up to three days. If you’d like to keep them longer, refrigerating them will extend their freshness up to a week.
Can I freeze Red Velvet Cheesecake Brownies – Rich and Decadent Dessert?
Absolutely! To freeze, wrap individual brownies in plastic wrap and place them in a freezer-safe bag. They can last up to three months—simply thaw at room temperature or briefly warm in the microwave for that fresh-out-of-the-oven taste.
As I wrap up this tale of Red Velvet Cheesecake Brownies, I can’t help but think about the many memories we’ve created around dessert. If you’re like me, baking holds a special energy—it’s all about crafting love and joy through food. Whether it’s a Tuesday night or a festive occasion, there’s something comforting about bringing family together with a shared dessert. Trust me, you’ll want to make this again and again; it’s simply meant to be savored!
Print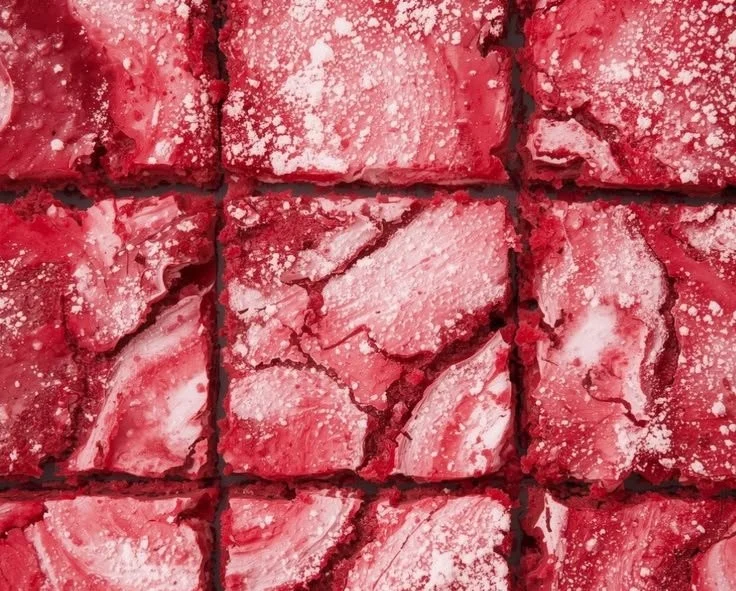
Red Velvet Cheesecake Brownies
Rich and decadent Red Velvet Cheesecake Brownies with a tangy cream cheese swirl, perfect for any gathering.
- Total Time: 50 minutes
- Yield: 16 servings
Ingredients
- 1/2 cup unsalted butter
- 1 cup granulated sugar
- 1/2 cup brown sugar
- 2 large eggs
- 1 cup all-purpose flour
- 1/3 cup cocoa powder
- 1 tablespoon red food coloring
- 1 teaspoon vanilla extract
- 8 ounces cream cheese, softened
- 1 cup powdered sugar
- 1/4 cup sour cream
Instructions
- Preheat your oven to 350°F (175°C) and grease and line an 8×8 inch baking pan with parchment paper.
- Melt the butter in a medium saucepan over medium heat, then remove from heat and stir in granulated sugar and brown sugar.
- Add the eggs one at a time, mixing thoroughly after each addition. Stir in vanilla extract and red food coloring until well combined.
- Whisk together flour, cocoa powder, and a pinch of salt in a separate bowl. Gradually fold the dry ingredients into the wet mixture until just combined.
- Beat the cream cheese in a mixing bowl until smooth, then add powdered sugar, sour cream, and an additional teaspoon of vanilla extract, mixing until creamy.
- Spread the brownie batter evenly in the prepared pan, dollop cream cheese mixture on top, and swirl with a knife.
- Bake for 30-35 minutes or until a toothpick inserted comes out with a few moist crumbs.
- Cool in the pan on a wire rack, then lift out with parchment paper, cut into squares, and serve.
Notes
For a lighter version, replace sour cream with Greek yogurt. Store leftovers in an airtight container at room temperature for up to three days or in the fridge for up to a week. You can also freeze them for up to three months.
- Prep Time: 15 minutes
- Cook Time: 35 minutes
- Category: Dessert
- Method: Baking
- Cuisine: American
- Diet: Vegetarian