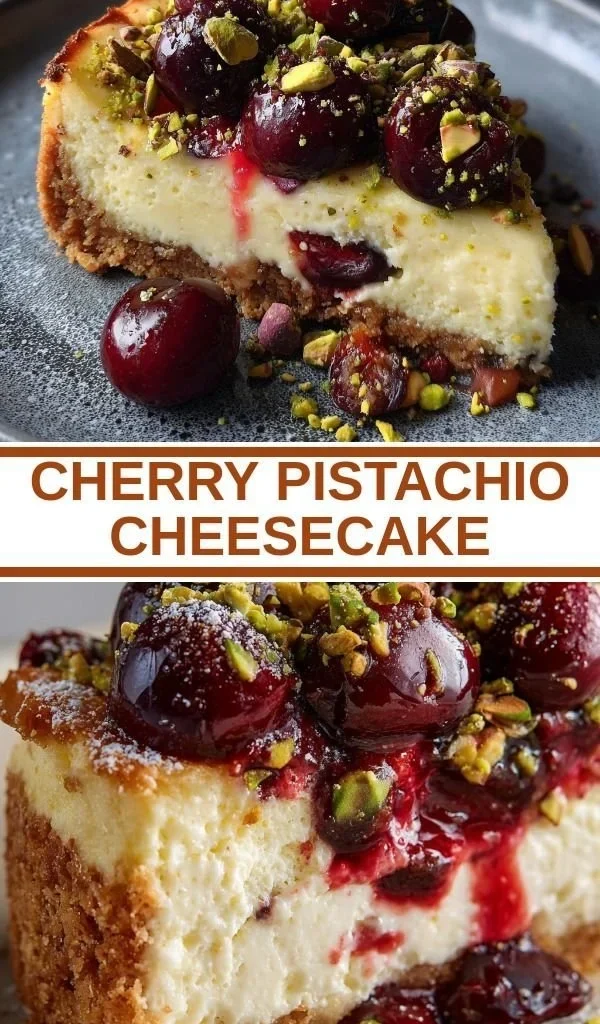
I still remember the first time I discovered the delight of Cherry Pistachio Cheesecake. It was a balmy July evening in Asheville, and my grandmother had just pulled a batch from the oven. The moment I walked into her kitchen, the sweet, slightly tart aroma of cherries mixed with the nutty undertones of freshly shelled pistachios enveloped me like a warm hug. As she carefully sliced into that velvety creature, each piece revealed a swirl of colors reminiscent of a summer sunset. That first forkful danced on my palate—creamy and luscious with just the right amount of crunch, transporting me back to countless summer picnics where laughter and love were the main ingredients.
Over the years, my love for this cheesecake, with its sweet-tart cherry compote atop a dreamy, creamy filling, has grown into a family tradition. I often make it for birthday celebrations and holidays, always with a sprinkle of crushed pistachios on top. Not only is it visually stunning, but it also encapsulates a beautiful blend of flavors that brings everyone together. If you haven’t had the chance to savor Cherry Pistachio Cheesecake yet, I encourage you to try it. I promise you—it’s a culinary embrace that holds stories and sweet memories in every bite.
Flavor and Popularity
The Unique Flavor Profile of Cherry Pistachio Cheesecake
Cherry Pistachio Cheesecake offers a sensational combination of flavors and textures that tantalize the taste buds. The creaminess of the cheesecake creates a luxurious base, while the cherries provide a sweet-tart burst that brightens each mouthful. The pistachios, with their earthy and buttery quality, deliver a satisfying crunch, complementing the richness of the cream cheese beautifully.
When enjoyed together, these ingredients create an umami explosion that dances on your tongue, leaving behind just the right amount of sweetness. You can taste the essence of summer with every bite, especially when the cherries are in season. Even outside their peak, using high-quality frozen cherries maintains that luscious flavor, making this cheesecake a delightful year-round treat.
Beyond the flavor, there’s a wonderful nostalgia tied up in Cherry Pistachio Cheesecake. It serves as a tangible reminder of summer gatherings and holiday celebrations, making it not just a dessert but a cornerstone of cherished family memories. As a result, it’s no wonder this dessert has found its way into the hearts of many, becoming a beloved staple around the dining table.
Why This Recipe Is a Family Favorite and Crowd-Pleaser
Every family has their go-to recipes, those special dishes we lean on during celebrations. Cherry Pistachio Cheesecake is my family’s secret weapon. It’s not just delicious; it’s a showstopper when it graces the dessert table. The stunning layers of vibrant red cherries and earthy green pistachios create an eye-catching centerpiece that draws everyone in.
After a big meal, you might think there’d be no room left in anyone’s belly for dessert, but when that cheesecake appears, time seems to pause, and that delightful slice vanishes in no time. Children and adults alike gravitate toward the creamy bliss, savoring each bite while sharing stories and laughter. Not only does it provide an opportunity for connection, but it also sparks heartfelt conversations about tradition and togetherness.
I’ve seen it happening time and again: as soon as the last slice is served, requests come pouring in for the recipe. There’s something heartwarming about sharing a beloved recipe; it spreads joy beyond your own family. For me, there’s no greater reward than knowing that my Cherry Pistachio Cheesecake brings smiles and happy memories to others, just as it has done for me and mine over the years.
Ingredients and Preparation
Essential Ingredients and Possible Substitutions
To create your own show-stopping Cherry Pistachio Cheesecake at home, you’ll need a few essential ingredients. Here’s what you’ll gather:
- Cream Cheese: Room temperature for easy mixing to yield that smooth and creamy filling.
- Sour Cream: Adds richness and tanginess, creating a delightful contrast to the sweetness of the cherries.
- Granulated Sugar: Sweetens the cheesecake without overpowering the other flavors.
- Eggs: Provides structure and stability while adding to the creaminess.
- Vanilla Extract: A splash to enhance the overall flavors beautifully.
- Cherry Filling: You can use homemade cherry compote or store-bought for convenience.
- Pistachios: Shelled and finely chopped, these add texture and a nutty flavor to the crust and garnish.
- Graham Cracker Crust: A buttery graham cracker crust is traditional, but feel free to opt for a nut crust for a gluten-free alternative.
If you need substitutions, consider this: Swap full-fat cream cheese with a lighter option if you’d prefer a less rich cheesecake, though it might alter the texture slightly. Greek yogurt can replace sour cream for a healthier twist, and almond extract makes a fine stand-in for vanilla for an extra layer of flavor. As for the crust, crushed almonds or pecans provide a tasty alternative if you’re looking to mix things up.
Step-by-Step Recipe Instructions with Tips
Now, here’s how to create your exquisite Cherry Pistachio Cheesecake, step by step:
1. Prepare the crust:
- Preheat your oven to 325°F (163°C).
- In a bowl, combine 1 ½ cups of crushed graham crackers with ½ cup melted butter and ¼ cup sugar. Mix until it resembles wet sand.
- Press the mixture into the bottom of a 9-inch springform pan to form an even layer.
- Bake for 10 minutes, then let it cool while you make the filling.
2. Make the cheesecake filling:
- In a large mixing bowl, beat 24 ounces of softened cream cheese until smooth.
- Add 1 cup of granulated sugar and mix until fluffy.
- Blend in ⅓ cup of sour cream, 2 eggs, and 1 teaspoon of vanilla extract until fully combined.
- Gently fold in ½ cup of finely chopped pistachios for that delightful crunch.
3. Assemble and bake:
- Pour the cheesecake filling over the cooled crust, smoothing the top with a spatula.
- Bake for 55-60 minutes or until the edges are set and the center is just slightly jiggly. Avoid overcooking, as it can lead to cracking.
- Once baked, turn off the oven and let the cheesecake cool inside for an hour.
4. Chill and serve:
- After it cools, cover the cheesecake with plastic wrap and refrigerate for at least 4 hours or overnight.
- When ready to serve, heat up your cherry filling and pour it over the top, garnishing with additional crushed pistachios.
Tips for Success:
- Always use high-quality ingredients, as they make a remarkable difference in flavor.
- Allow your cream cheese to come to room temperature to avoid lumps in the filling.
- For easy removal, run a knife around the edges of the cheesecake before releasing the springform pan.
Cooking Techniques and Tips
How to Cook Cherry Pistachio Cheesecake Perfectly
Creating the perfect Cherry Pistachio Cheesecake requires some attention to detail to ensure it rises beautifully and has that sought-after silkiness. Here are a few techniques to keep in mind:
- Room Temperature Ingredients: Ensure that your cream cheese and eggs are at room temperature before mixing. This ensures a smooth texture and prevents lumps.
- Baking in a Water Bath: To prevent cracking, consider baking your cheesecake in a water bath. Wrapping the springform pan in aluminum foil before placing it in a deeper pan filled with hot water can create a humid environment that helps the cheesecake cook evenly.
- Avoid Opening the Oven Door: As tempting as it may be, refrain from opening the oven door during baking, as it can cause a sudden drop in temperature and result in cracks.
Common Mistakes to Avoid
- Overmixing the Batter: While it’s important to combine ingredients thoroughly, overmixing can incorporate too much air, leading to cracks during baking. Mix just until fully combined.
- Skipping the Cooling Process: Rushing to chill the cheesecake can ruin the texture. Always allow it to cool properly at room temperature before refrigerating.
- Not Chilling Long Enough: The cooling time is essential for the flavors to meld and for the cheesecake to firm up. Give it at least 4 hours, or better yet, overnight.
Health Benefits and Serving Suggestions
Nutritional Value of Cherry Pistachio Cheesecake
Though Cherry Pistachio Cheesecake is a treat best enjoyed in moderation, it does offer some nutritional benefits. Cherries are full of antioxidants, vitamins, and minerals that are beneficial for heart health and immunity. Plus, pistachios pack a protein punch and promote a feeling of fullness with their healthy fats.
By incorporating these wholesome ingredients, you can indulge without guilt during special occasions. Remember, the joy of sharing good food with loved ones makes every calorie worth it!
Best Ways to Serve and Pair This Dish
Cherry Pistachio Cheesecake captures attention and satisfies taste buds on its own, but you can elevate the experience by serving it alongside fresh whipped cream or vanilla ice cream for extra creaminess. A sprig of mint can also add a refreshing touch, enhancing those vibrant flavors.
For beverage pairing, try a light dessert wine or a fresh berry tea to complement the cheesecake’s tangy cherry notes. Coffee lovers can enjoy a smooth espresso or a rich cappuccino alongside, creating a delightful balance with the creaminess of the cheesecake.
FAQ Section
What type of nuts are best for Cherry Pistachio Cheesecake?
Pistachios shine in this recipe due to their creamy texture and unique flavor. However, if you’re seeking alternatives, feel free to experiment with crushed almonds or pecans for a different nutty twist.
Can I use dried cherries instead of fresh?
Dried cherries work well, but be sure to rehydrate them in warm water or cherry juice before using them in the cheesecake. This will help bring back some of their juiciness.
How do I store leftover Cherry Pistachio Cheesecake?
Wrap your uneaten cheesecake tightly in plastic wrap or place it in an airtight container before storing in the fridge. It keeps well for about 5 to 7 days.
Can I freeze Cherry Pistachio Cheesecake?
Absolutely! To freeze, make sure the cheesecake is completely cooled and wrapped properly in plastic wrap and foil. It can last for up to 3 months. When ready to enjoy, thaw it in the fridge overnight before serving.
Conclusion
If you’re like me, you cherish recipes that combine nostalgia and flavor—a true tapestry of memories and joy. Cherry Pistachio Cheesecake is one of those treasures. There’s something comforting about gathering around the table, sharing laughter, and hearing everyone rave about that luscious slice. Trust me, you’ll want to make this again and again, not just for the exceptional taste, but for the moments it creates. So get in that kitchen, roll up your sleeves, and whip up this delightful cheesecake. You won’t regret it!
Print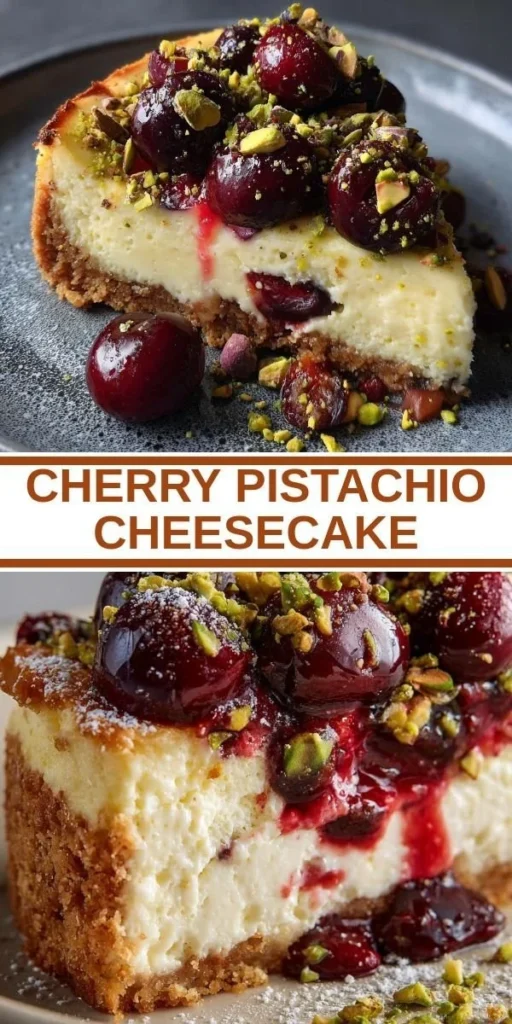
Cherry Pistachio Cheesecake
A luxurious cherry pistachio cheesecake with a creamy filling, topped with sweet-tart cherry compote and crushed pistachios.
- Total Time: 290 minutes
- Yield: 12 servings
Ingredients
- 24 ounces cream cheese, room temperature
- 1 cup granulated sugar
- ⅓ cup sour cream
- 2 large eggs
- 1 teaspoon vanilla extract
- ½ cup cherry filling (homemade or store-bought)
- ½ cup finely chopped pistachios
- 1 ½ cups crushed graham crackers
- ½ cup melted butter
- ¼ cup sugar for the crust
Instructions
- Preheat your oven to 325°F (163°C).
- Combine crushed graham crackers, melted butter, and sugar in a bowl; mix until it resembles wet sand.
- Press the mixture into the bottom of a 9-inch springform pan to form an even layer and bake for 10 minutes. Let cool.
- In a large mixing bowl, beat cream cheese until smooth, then add sugar and mix until fluffy.
- Blend in sour cream, eggs, and vanilla extract until fully combined.
- Gently fold in the pistachios.
- Pour the cheesecake filling over the cooled crust and smooth the top.
- Bake for 55-60 minutes until the edges are set and the center is slightly jiggly.
- Turn off the oven and let it cool inside for an hour.
- Cover the cheesecake with plastic wrap and refrigerate for at least 4 hours or overnight.
- Heat the cherry filling and pour it over the chilled cheesecake, garnishing with crushed pistachios before serving.
Notes
Use room temperature ingredients for the best texture and consider a water bath for baking to avoid cracks.
- Prep Time: 20 minutes
- Cook Time: 70 minutes
- Category: Dessert
- Method: Baking
- Cuisine: American
- Diet: Vegetarian