I can still picture that blissful day when I first tried making Red Velvet Brownies. It was a chilly autumn afternoon in Asheville, and the leaves were just beginning to change into a riot of reds and golds. I’d flipped through a recipe book my grandmother had given me—a treasure trove of comforting desserts. As I stumbled upon the recipe for Red Velvet Brownies, I felt a spark of excitement. My heart warmed at the thought of merging the rich, velvety flavor of red velvet cake with the decadent fudginess of a brownie.
There’s something enchanting about the deep crimson hue, drawing you in like a cozy armchair on a rainy day. I remembered how my grandmother would whip up her famous red velvet cake for family gatherings, creating a tradition that felt sacred. With my apron tied tightly, I dove into measuring out flour and cocoa powder, the scent of rich chocolate wafting through the kitchen, enveloping me like a warm hug. When they came out of the oven, the aroma was heavenly, and the brownies, with their glossy sheen and inviting color, beckoned me. I felt a delightful surge of joy not just at creating something wonderful but sharing it with family and friends—after all, that’s why I cook.
In this article, I’m excited to share the magic of Red Velvet Brownies with you, blending my Southern roots with a dash of curiosity and joy. Together, we’ll explore every facet of this beloved dessert that has stolen hearts and taste buds alike.
Flavor and Popularity
The Unique Flavor Profile of Red Velvet Brownies
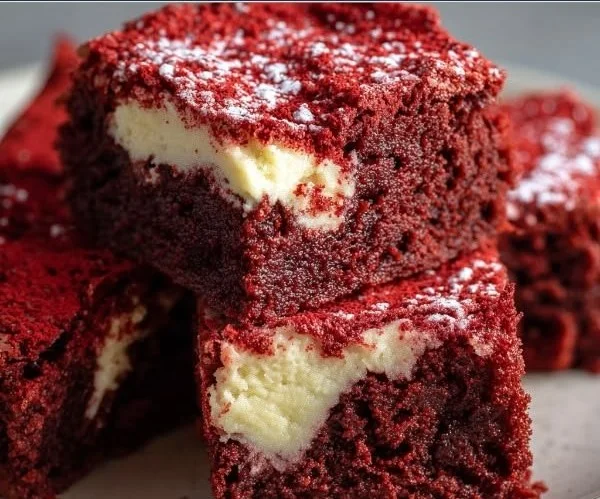
Red Velvet Brownies boast an extraordinary flavor profile that effortlessly combines the richness of chocolate and the tangy sweet notes of buttermilk. The subtle cocoa undertones mingle with a hint of vanilla, resulting in a dessert that’s as complex as it is delightful. Each bite feels indulgent, and the cream cheese frosting or a velvety ganache often complements this treat beautifully, offering a delightful creaminess that contrasts with the fudgy brownie texture. This interplay of flavors makes Red Velvet Brownies a stand-out dessert, perfect for birthdays, holiday gatherings, or simply when you want to treat yourself to something special.
Why This Recipe Is a Family Favorite and Crowd-Pleaser
Every family has that go-to recipe that gathers everyone around the table, and my Red Velvet Brownies consistently play that role in my family. What I love most is the joyous expressions on my loved ones’ faces as they take their first bites, the way their eyes light up as they savor the flavor. Whether it’s a casual Sunday gathering or a more festive occasion, these brownies are an absolute crowd-pleaser. The vibrant color adds visual appeal, and the rich taste never fails to charm even the pickiest of eaters. Plus, the thrill of shared laughter and memories while baking together adds a layer of love that makes every batch extra special.
Ingredients and Preparation
Essential Ingredients and Possible Substitutions
To whip up a batch of these delightful Red Velvet Brownies, you’ll need a few essential ingredients that work in harmony to bring out that lush flavor. Here’s what you’ll need:
- Unsalted Butter: The key to achieving that rich, fudgy texture. Feel free to substitute with margarine or coconut oil for a dairy-free option.
- Granulated Sugar: This helps create sweetness and moisture in the brownies. You can swap half for brown sugar to enhance caramel flavors.
- Eggs: Essential for bonding and structure; I always use large eggs for best results.
- All-Purpose Flour: Provides the base for your brownies; whole wheat flour can work if you prefer a heartier texture.
- Cocoa Powder: A must for chocolate flavor; Dutch-processed cocoa gives a deeper taste.
- Red Food Coloring: The star of the show! Use liquid or gel food coloring for vibrant hues, or opt for beet juice if you want a natural version.
- Baking Powder and Salt: These agents ensure the brownies rise perfectly and prevent them from being overly dense.
- Vanilla Extract: Adds warm, aromatic notes to the flavor profile.
- Cream Cheese or Glaze (optional): For those who love a sweet topping, a cream cheese frosting takes it over the top!
If you’re missing some ingredients, don’t fret! I often find that I can get creative with what’s in my pantry. For example, Greek yogurt works well as a substitute for butter, lending moisture without compromising taste.
Step-by-Step Recipe Instructions with Tips
Ready to create your delicious Red Velvet Brownies? Let’s walk through this easy recipe!
-
Preheat Your Oven: Set it to 350°F (175°C) and prepare an 8×8-inch baking dish by greasing it lightly with butter or lining it with parchment paper for easy removal.
-
Melt the Butter: In a medium saucepan, melt the unsalted butter over low heat. Allow it to cool slightly once melted to ensure our eggs don’t scramble in the next step!
-
Combine Wet Ingredients: In a mixing bowl, whisk together the melted butter and granulated sugar until they form a smooth mixture. Add the eggs one at a time, beating well after each addition. Stir in the vanilla extract and red food coloring until well-combined.
-
Sift Dry Ingredients: In another bowl, sift together the all-purpose flour, cocoa powder, baking powder, and salt. This step incorporates air and helps eliminate any lumps.
-
Mix Dry with Wet: Gradually fold the dry ingredients into your wet mixture. Be careful not to overmix; stir just until no dry flour is visible for that fudgy texture.
-
Pour Into Baking Dish: Spread the batter evenly in the prepared baking dish and tap it gently on the counter to release any air bubbles.
-
Bake: Place it in the preheated oven and bake for about 20-25 minutes, or until a toothpick inserted in the center comes out with a few moist crumbs.
-
Cool Down: Once baked, allow the brownies to cool in the pan for at least 10 minutes before transferring them to a wire rack to cool completely.
-
Optional Cream Cheese Frosting: If desired, whip up a simple cream cheese frosting by combining softened cream cheese, butter, powdered sugar, and a splash of vanilla. Frost the cooled brownies generously.
For an extra special touch, sprinkle some crushed nuts or chocolate chips into the batter before baking. Whatever you decide to add, I promise—it’ll make the experience even more delightful!
Cooking Techniques and Tips
How to Cook Red Velvet Brownies Perfectly
To ensure your Red Velvet Brownies turn out perfectly fudgy and flavorful every time, keep these tips in mind:
- Use Room Temperature Ingredients: Let your eggs and butter come to room temperature before mixing. This brings more air into the batter and leads to a fluffier texture.
- Don’t Overbake: Checking for doneness a few minutes before the recommended time is crucial. Brownies continue to cook slightly once removed from the oven, so a toothpick should come out with a few moist crumbs.
Common Mistakes to Avoid
While making Red Velvet Brownies is generally straightforward, even the best of us can overlook small details that can impact the final product:
- Ignoring the Cooling Process: Patience is key; if you cut them while still warm, they might crumble instead of maintaining that lovely texture.
- Using Too Much Food Coloring: It’s easy to get carried away thinking more color equals better results, but this can alter flavor. Just stick to the recommended amount, and you’ll get that perfect striking red without compromising taste.
Health Benefits and Serving Suggestions
Nutritional Value of Red Velvet Brownies
While Red Velvet Brownies are an indulgent treat, let’s be honest—ingredient choices can help make this dessert a tad healthier. By using whole grain flour for a fiber boost or substituting sugars with alternatives, you can savor them without guilt. Plus, the cocoa powder offers health benefits, including antioxidants that promote heart health.
Best Ways to Serve and Pair This Dish
Your Red Velvet Brownies deserve the royal treatment! Here are some delightful serving suggestions:
- Pair with Vanilla Ice Cream: A scoop of creamy ice cream complements the chewy brownie texture and balances the flavors wonderfully.
- Serve with Fresh Berries: Adding strawberries or raspberries not only enhances the visual appeal but also introduces a refreshing acidity that cuts through the sweetness.
- Coffee or Tea: For a cozy afternoon treat, serve these brownies with a steaming mug of coffee or fragrant herbal tea.
Feel free to experiment with serving styles; Red Velvet Brownies are versatile and can easily adapt to your gathering’s theme!
FAQ Section
What type of mushrooms are best for Red Velvet Brownies?
While mushrooms aren’t a traditional ingredient in Red Velvet Brownies, if you’re looking to experiment, I recommend using earthy varieties like portobello or shiitake in savory applications, not for this dessert.
Can I use dried garlic instead of fresh?
No garlic is historically present in recipes for Red Velvet Brownies. However, if you find yourself in need of substitutions in savory dishes, fresh is often better. Stick to sweet flavors for this treat!
How do I store leftover Red Velvet Brownies?
Keep them stored in an airtight container at room temperature for up to three days. For longer freshness, place them in the refrigerator.
Can I freeze Red Velvet Brownies?
Absolutely! Red Velvet Brownies freeze well. Just wrap individual pieces in plastic wrap followed by foil or place them in a freezer-safe container. They can last up to three months. When you’re ready to enjoy, thaw them at room temperature or gently in the microwave.
Conclusion
If you’re like me, you’ll cherish the process of creating and sharing Red Velvet Brownies just as much as you enjoy eating them. There’s something comforting about the act of baking—every scoop and stir carries with it a story, a memory, and a sprinkle of love. I encourage you to try this recipe and let it fill your home with warmth and joy. Trust me, you’ll want to make this again and again. Sharing a plate of these delightful brownies with loved ones will create beautiful moments worth cherishing forever!
Print
Red Velvet Brownies
Deliciously rich and fudgy Red Velvet Brownies, perfect for satisfying your sweet tooth and impressing loved ones.
- Total Time: 40 minutes
- Yield: 16 brownies
Ingredients
- 1/2 cup unsalted butter
- 1 cup granulated sugar
- 2 large eggs
- 1 cup all-purpose flour
- 1/4 cup cocoa powder
- 1 tsp baking powder
- 1/4 tsp salt
- 1 tsp vanilla extract
- 1 oz red food coloring
- Optional: cream cheese frosting for topping
Instructions
- Preheat your oven to 350°F (175°C) and prepare an 8×8-inch baking dish by greasing it lightly with butter or lining it with parchment paper.
- Melt the butter in a medium saucepan over low heat. Allow it to cool slightly.
- Combine the melted butter and granulated sugar in a mixing bowl until smooth. Add eggs one at a time, beating well after each addition. Stir in the vanilla extract and red food coloring.
- Sift together the flour, cocoa powder, baking powder, and salt in another bowl.
- Mix the dry ingredients with the wet mixture, stirring just until no dry flour is visible.
- Pour the batter into the prepared baking dish and tap gently on the counter to release air bubbles.
- Bake for about 20-25 minutes or until a toothpick comes out with a few moist crumbs.
- Cool in the pan for at least 10 minutes before transferring to a wire rack.
- Optional: Prepare cream cheese frosting and frost the cooled brownies if desired.
Notes
Use room temperature ingredients for best results and avoid overbaking for a fudgy texture.
- Prep Time: 15 minutes
- Cook Time: 25 minutes
- Category: Dessert
- Method: Baking
- Cuisine: American
- Diet: Vegetarian