There’s a magic to baking that can make any ordinary day feel special, isn’t there? I remember the first time I baked Bakery-Style Oreo Muffins. The smell of chocolate wafting through my kitchen took me back to my grandmother’s cozy little home, where we often whipped up sweet treats together. The joy of creating something from scratch was always a thrilling adventure for us. I can still hear her laughter mingling with the hum of the mixer, her soft hands expertly blending ingredients while I stood on a stool, eager to help.
Those Bakery-Style Oreo Muffins emerged from the oven golden-brown, their tops crinkled like a soft blanket on a winter morning. As they cooled, I could hardly contain my excitement. Poking one of those luscious, chocolatey muffins with my finger was a rite of passage; it sank slightly, revealing the cookie chunks nestled within, almost sleepy and ready for indulgence. They were an instant hit with my family, transforming our Wednesday afternoon into a mini celebration. Every bite was rich and comforting, a reminder that great recipes often come from cherished memories and shared laughter.
Flavor and Popularity
The Unique Flavor Profile of Bakery-Style Oreo Muffins
Bakery-Style Oreo Muffins boast a flavor profile that’s nothing short of irresistible. Picture this: the rich, dark chocolate mingling effortlessly with creamy vanilla, with the addition of crunchy cookie pieces creating a delightful texture. Each bite, warm from the oven, delivers a combination of sweet and slightly bitter notes, perfectly balancing the indulgence of cookies and the comforting nature of muffins.
The beauty of these muffins lies not only in their taste but also in their ability to evoke nostalgia. They remind us of childhood treats and late-night snacks, making them a beloved choice for both kids and adults alike. These muffins transcend the ordinary breakfast fare, transforming any moment into a joyous occasion. Their delightful sweetness pairs perfectly with a morning coffee or an afternoon tea, making them a versatile option for various occasions.
Why This Recipe Is a Family Favorite and Crowd-Pleaser
It’s no wonder that Bakery-Style Oreo Muffins quickly became a family favorite in my household. They’re easy to whip up and even easier to enjoy! There’s something undeniably enjoyable about the process—from the joyful chaos of mixing flour and cocoa to the heavenly aroma wafting through the house as they bake. They become a delightful treat whether you’re hosting a brunch, surprising a friend, or simply craving a taste of home.
Every time I bake these muffins, I can’t help but think of the memories they create. Watching my family dive into those chocolatey morsels, smiles brightening their faces, reaffirms why I love to cook. When you share a warm, freshly baked treat, you’re not just sharing food; you’re sharing love. And these Bakery-Style Oreo Muffins are the ultimate expression of that sentiment.
Ingredients and Preparation
Essential Ingredients and Possible Substitutions
To create the magical Bakery-Style Oreo Muffins, you’ll need a few essential ingredients. Here’s what you’ll need for a tantalizing batch:
- All-purpose flour: This forms the base of your muffins and provides the structure.
- Granulated sugar: For that sweet indulgence that complements the cookies beautifully.
- Unsweetened cocoa powder: Adds depth and a rich chocolate flavor.
- Baking powder and baking soda: These leavening agents help your muffins rise perfectly.
- Salt: A pinch to balance the sweetness.
- Eggs: They bind the ingredients together and add moisture.
- Buttermilk: This ingredient ensures your muffins are moist and tender.
- Vegetable oil or melted butter: For that rich flavor, either option works beautifully.
- Oreo cookies: The star of the show! These will be crushed and folded into the batter.
If you’re looking for substitutions, you can easily swap out all-purpose flour for a gluten-free blend. For a dairy-free version, replace buttermilk with almond milk mixed with a little vinegar. And if you’re in the mood for a twist, try adding some chocolate chips along with the Oreo cookie crumbles to amp up the decadence.
Step-by-Step Recipe Instructions with Tips
Creating these Bakery-Style Oreo Muffins is a straightforward yet enjoyable process. Follow these steps to ensure your muffins turn out perfect every time:
-
Preheat your oven to 350°F (175°C) and prepare a muffin tin with liners.
-
In a mixing bowl, combine the dry ingredients—flour, sugar, cocoa powder, baking powder, baking soda, and salt. Whisk them together until well blended.
-
In another bowl, mix the wet ingredients—eggs, buttermilk, and vegetable oil (or melted butter). Stir gently until combined.
-
Pour the wet mixture into the dry ingredients and fold together until just combined. Be careful not to overmix; you want to keep that fluffy texture.
-
Gently fold in the crushed Oreo cookies, making sure they’re evenly distributed throughout the batter.
-
Scoop the batter into the prepared muffin tin, filling each liner about two-thirds full. You can add an extra cookie piece on top for a decorative touch!
-
Bake for 18-20 minutes, or until a toothpick inserted in the center comes out clean. The tops will look beautifully domed and may crack slightly—this is exactly how they should be!
-
Once baked, let the muffins cool in the pan for a few minutes before transferring them to a wire rack to cool completely. The aroma will be hard to resist, I promise!
Cooking Techniques and Tips
How to Cook Bakery-Style Oreo Muffins Perfectly
Cooking these muffins to perfection relies on a few simple techniques. First, make sure your ingredients are at room temperature; this helps create a smoother batter. Measuring accurately is also crucial. Packing flour can lead to dense muffins, so spoon it into your measuring cup and level it off with a knife for the best results.
For even distribution, try to crush the Oreos into smaller pieces rather than fine crumbs. This way, you’ll get those delightful little bursts of cookie goodness in every bite. And remember, the cooling time is essential; letting them cool properly allows the muffins to set and maintain their fluffy texture.
Common Mistakes to Avoid
When baking, especially sweet treats like Bakery-Style Oreo Muffins, it’s easy to stumble into some common traps. One of the most critical mistakes is overmixing the batter. This can lead to dense, gummy muffins instead of light and fluffy ones. Focus on folding the mixture gently until just blended.
Another pitfall is not properly measuring your ingredients. A little too much flour or not enough sugar can significantly alter the final product. Investing in a kitchen scale can help ensure accuracy and consistency in your baking.
Lastly, be cautious with your baking time. Every oven is different, so it’s wise to check your muffins a couple of minutes before the suggested time. Once done, resist the temptation to pull them out too early; underbaked muffins won’t have the proper texture.
Health Benefits and Serving Suggestions
Nutritional Value of Bakery-Style Oreo Muffins
While Bakery-Style Oreo Muffins are a decadent treat, they can still have their place in a balanced diet. These muffins offer a delightful blend of carbohydrates, fats, and some protein, with the added pleasure of chocolate and cookie flavor. Enjoying one of these muffins with a side of fresh fruit can provide a well-rounded snack or breakfast option.
These treats also pack a bit of calcium from the buttermilk and are a source of energy, making them ideal for a playful brunch with family or a lazy Sunday morning indulgence. Just remember to savor in moderation, allowing yourself to delight in their sweetness without overdoing it.
Best Ways to Serve and Pair This Dish
Bakery-Style Oreo Muffins shine when served warm, allowing the chocolate to melt and create that soft, gooey experience. For a delightful touch, consider pairing these muffins with a scoop of vanilla ice cream, a dollop of whipped cream, or a drizzle of chocolate syrup. They also make a lovely addition to any brunch table alongside fresh coffee or a chilled glass of milk.
To elevate your presentation, consider a sprinkle of powdered sugar on top, or serve them on a colorful platter with a variety of baked goods. Offering an assortment invites everyone to indulge and enjoy a moment of togetherness.
FAQ Section
What type of cookies are best for Bakery-Style Oreo Muffins?
Using classic Oreo cookies is ideal for this recipe, as their flavor and texture create the perfect balance in the muffins. However, feel free to experiment with other types like double-stuffed Oreos for extra creaminess or even flavored varieties for a unique twist.
Can I use dried garlic instead of fresh?
While dried ingredients have their place in the kitchen, fresh ingredients bring a vibrant flavor that dried ones simply cannot replicate. For this recipe, I recommend sticking to traditional ingredients—focusing on the luscious chocolate and cookie flavors that make these muffins memorable.
How do I store leftover Bakery-Style Oreo Muffins?
To store leftover muffins, let them cool completely before placing them in an airtight container. You can keep them at room temperature for up to three days. If you want to extend their freshness, consider refrigerating them for a week.
Can I freeze Bakery-Style Oreo Muffins?
Absolutely! Once cooled, wrap the muffins tightly in plastic wrap and then in foil, or place them in a freezer-safe container. They can last frozen for about three months. When you’re ready for more chocolatey goodness, simply thaw them at room temperature or pop them in the microwave for a few seconds to warm them up.
Conclusion
If you’re like me, there’s something comforting about filling your home with the scent of freshly baked Bakery-Style Oreo Muffins. They offer more than just a delightful flavor; each bite carries a piece of my heart, memories, and the warmth of family togetherness. Trust me, you’ll want to make this again and again. Whether it’s a treat for yourself or shared with loved ones, these muffins will surely bring a smile to your faces and joy to your hearts. So gather your ingredients and start baking—your taste buds will thank you!
Print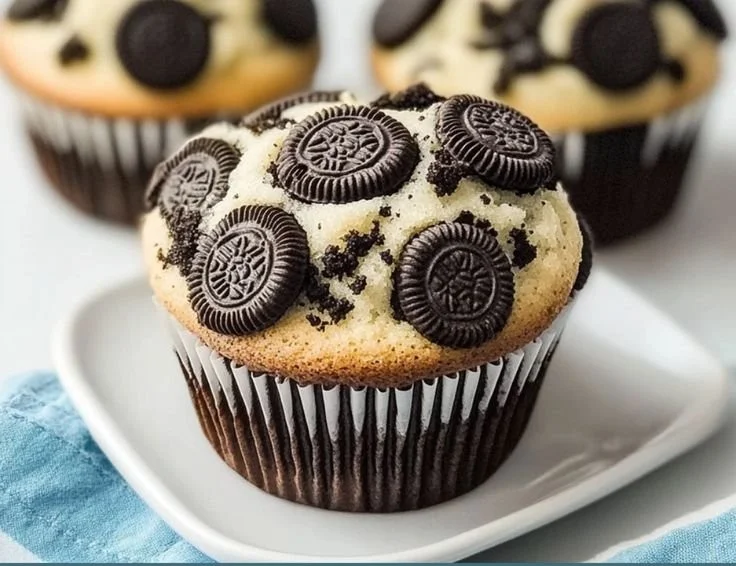
Bakery-Style Oreo Muffins
Indulge in these rich and chocolatey Bakery-Style Oreo Muffins, filled with creamy vanilla and crunchy Oreo chunks, perfect for any occasion.
- Total Time: 35 minutes
- Yield: 12 servings
Ingredients
- 2 cups all-purpose flour
- 1 cup granulated sugar
- 1/2 cup unsweetened cocoa powder
- 2 tsp baking powder
- 1 tsp baking soda
- 1/2 tsp salt
- 2 large eggs
- 1 cup buttermilk
- 1/2 cup vegetable oil or melted butter
- 1 cup crushed Oreo cookies
Instructions
- Preheat your oven to 350°F (175°C) and prepare a muffin tin with liners.
- In a mixing bowl, combine the dry ingredients—flour, sugar, cocoa powder, baking powder, baking soda, and salt. Whisk until well blended.
- In another bowl, mix the wet ingredients—eggs, buttermilk, and vegetable oil (or melted butter). Stir gently until combined.
- Pour the wet mixture into the dry ingredients and fold until just combined; do not overmix.
- Gently fold in the crushed Oreo cookies until evenly distributed.
- Scoop the batter into the prepared muffin tin, filling each liner about two-thirds full. Add an extra cookie piece on top for decoration.
- Bake for 18-20 minutes, or until a toothpick inserted comes out clean.
- Let the muffins cool in the pan for a few minutes before transferring them to a wire rack to cool completely.
Notes
For a gluten-free version, use a gluten-free flour blend. Substitute buttermilk with almond milk and vinegar for a dairy-free option.
- Prep Time: 15 minutes
- Cook Time: 20 minutes
- Category: Dessert
- Method: Baking
- Cuisine: American
- Diet: Vegetarian