The smell of fresh muffins wafting through the kitchen brings back some of my favorite memories. I still remember the first time I took a bite of Bakery-Style Oreo Muffins, perched at my grandmother’s kitchen table in Asheville. The sun poured through the window, casting warm rays on the delicate, fluffy muffins that were bursting with chocolatey goodness. It was one of those perfectly simple moments, where time seemed to pause, and all I could think about was the joy of those first few bites. My grandmother always had a knack for turning something ordinary into extraordinary, and these muffins were no exception. With the nostalgic crunch of Oreos baked into the batter, each muffin had a delightful surprise, just like a hug from my grandmother. It became a cherished family recipe—a simple yet glamorous treat that made any day feel special. Today, I’m excited to share how to make these Bakery-Style Oreo Muffins, so you can create your own delicious memories.
When it comes to flavor and popularity, Bakery-Style Oreo Muffins have a unique profile that appeals to kids and adults alike. The balance of soft, moist cake combined with the familiar taste of Oreos makes for a delightful treat that feels indulgent yet comforting. These muffins, with their rich cocoa flavor and hint of cream filling, awaken the senses in a way that few baked goods can. It’s amazing how just the right combination of ingredients can create such warm feelings of nostalgia and happiness.
In my own home, these muffins quickly became a family favorite, a sought-after treat for breakfast, after-school snacks, or that special Sunday brunch. People just can’t resist the allure of a freshly baked muffin, especially when they’re chock-full of crunchy Oreo bits. Whether it’s my grandchildren who beg for a batch or friends dropping by for coffee, these Bakery-Style Oreo Muffins are always a hit. And let’s be honest, who could say no to something that looks and tastes as indulgent as a chocolate cupcake but is deceptively easy to make?
To whip up your own Bakery-Style Oreo Muffins, let’s gather the essential ingredients:
- All-purpose flour: The base for that airy texture.
- Granulated sugar: Sweetness is key to balance the rich chocolate.
- Cocoa powder: This gives our muffins the rich, decadent chocolate flavor.
- Baking powder and baking soda: The perfect leavening agents for fluffy muffins.
- Eggs: These will bind the ingredients together.
- Milk: For moisture and richness, you can use whole, almond, or even oat milk.
- Vegetable oil: This adds a lovely moistness to the muffins.
- Oreos: The star of the show! You can use regular or double-stuffed for extra creaminess.
Don’t worry if you need to make substitutions! If you’re looking for a healthier option, consider using Greek yogurt instead of oil or milk for added protein. You can also replace all-purpose flour with almond flour for a gluten-free experience. If Oreos aren’t your thing or you want to try a different twist, substitute with chocolate chip cookies or even mint Oreos for a refreshing take.
Now that we have our ingredients sorted, let’s dive into the step-by-step recipe. Baking is often about precision, but it should also be fun—so don’t hesitate to put a little love into each step!
Start by preheating your oven to 350°F (175°C). This ensures your muffins bake evenly from the beginning. While the oven warms up, grab a large mixing bowl and sift together the flour, cocoa powder, baking powder, baking soda, and sugar. This not only combines the dry ingredients but also helps avoid lumps—no one wants a clump of cocoa powder in their muffin!
In another bowl, whisk together your eggs, milk, and vegetable oil until fully incorporated. As you do this, take a moment to appreciate the hypnotic swirling of colors. Just like the first rays of sunlight breaking through a foggy morning, your mixture will come together beautifully. Gently fold the wet ingredients into the dry mixture, stirring until just combined. Overmixing can make your muffins tough, and we want them to be soft and pillowy!
Now, here’s the secret sauce: take your crumbled Oreos and fold them into the muffin batter. The moment the cookies hit that chocolate mixture is pure delight—the crunchiness offers a beautiful contrast to the mushy softness of the muffin. Line a muffin tin with paper liners or simply grease it well, then scoop the batter into the cups, filling them about three-quarters full. You want enough room for them to rise!
For an extra indulgence, top each muffin with a few Oreos broken up into smaller pieces. When these beauties bake, the cookies will crisp up and create a wonderful texture on top. Place them in the oven and bake for about 18-20 minutes. You’ll know they’re ready when a toothpick comes out clean—the perfect test for a muffin.
While those muffins are baking, enjoy the smell that fills your home. There’s something utterly comforting about having freshly baked goods wafting through the air, isn’t there? When they’re done, let them cool for a few moments before taking them out of the tin. You can serve them warm or store them for later. Trust me, nothing beats the moment you sink your teeth into a Bakery-Style Oreo Muffin, while that fluffy chocolate cake merges with the crunchy bits of Oreo—pure bliss!
When it comes to cooking techniques, here are a few tips for achieving perfect Bakery-Style Oreo Muffins every time. First, always measure your ingredients accurately. A kitchen scale can be a lifesaver for precision. Second, make sure your eggs and milk are at room temperature before adding them to the mix; this leads to a smoother batter and fluffier muffins.
Another crucial detail is not to overbake. Remember, muffins continue to cook while they cool down, so pulling them out of the oven a minute too soon can actually save a dry muffin. Lastly, keep an eye on your oven temperature; every oven is different. If you know yours bakes hotter or cooler than average, adjust the time as needed.
You’ll want to avoid some common mistakes too. Overmixing is the most frequent offender; it can lead to dense, tough muffins instead of fluffy delights. Always fold in the Oreos gently and just until combined. Also, remember that baking powder and soda are time-sensitive, losing their potency over time, so check the expiration date before starting.
Now that you’ve created a delightful batch of Bakery-Style Oreo Muffins, let’s talk about serving suggestions and benefits! While these muffins taste heavenly on their own, consider pairing them with a dollop of whipped cream or a scoop of ice cream for a mouthwatering dessert. You could also whip up a simple berry compote to drizzle on top, adding a vibrant burst of flavor.
Nutritionally, each muffin is a treat—however, enjoying them in moderation is key. While packed with sweetness, they can still be a part of a balanced diet when paired with fresh fruit or served as a dessert after a wholesome meal. If you do choose to go lighter on the sugar, don’t worry! The rich flavor of the cocoa and Oreos means you can use less sugar without sacrificing taste.
As for storing those delicious Bakery-Style Oreo Muffins, let them cool completely before placing them in an airtight container. They can stay fresh at room temperature for up to three days. If you have any leftovers—though it may be hard to keep them around for long—they freeze wonderfully too! Just wrap each muffin individually and place them in a freezer bag, and they can last for up to three months. Whenever the craving strikes, simply pop them in the microwave for a few seconds, and they’ll taste just as good as fresh.
You’ve probably got a few questions trapped in your mind, and that’s perfectly natural! What type of mushrooms are best for Bakery-Style Oreo Muffins? While mushrooms are not an ingredient in these muffins, swapping in earthy, diced options as a savory treat can lead to delicious fun in other baked creations! The recipe, however, favors the indulgent aspect of Oreos and chocolate.
Can I use dried garlic instead of fresh? Again, it’s not a part of this sweet treat’s profile. But for recipes involving more savory themes, fresh garlic usually delivers a sharper taste while dried can carry a milder flavor.
How do I store leftover Bakery-Style Oreo Muffins? Ensure they cool completely, and then place them either in an airtight container or wrapped tightly before storing. They’ll stay delightful at room temperature for a few days.
Can I freeze Bakery-Style Oreo Muffins? Definitely! Just remember to wrap them tightly to prevent freezer burn, and they’ll be ready for your future cravings.
As we wrap up this delicious journey, I can’t help but feel a wave of nostalgia mixed with excitement. If you’re like me, there’s something comforting about taking a simple recipe and adding your own personality to it. Baking isn’t just about following steps; it’s also about creating experiences for those we love. There’s nothing quite like the joy of sharing a warm, fresh batch of Bakery-Style Oreo Muffins with family and friends, creating lasting memories with each bite.
So, gather your loved ones in the kitchen and get ready; I promise this recipe will spark joy and happiness in every corner of your home. Trust me, you’ll want to make this again and again.
Print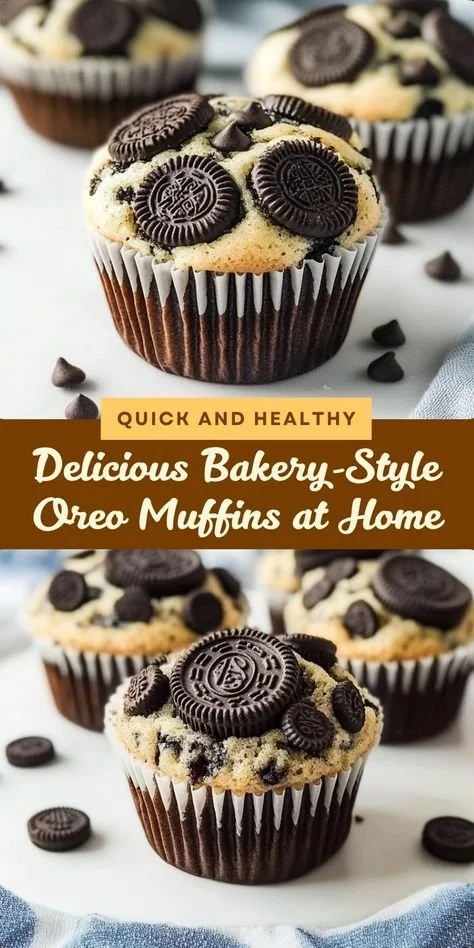
Bakery-Style Oreo Muffins
Delicious Bakery-Style Oreo Muffins that combine soft, moist chocolate cake with crunchy Oreo bits for a nostalgic treat.
- Total Time: 35 minutes
- Yield: 12 muffins
Ingredients
- 2 cups all-purpose flour
- 1 cup granulated sugar
- 1/2 cup cocoa powder
- 2 teaspoons baking powder
- 1 teaspoon baking soda
- 2 large eggs
- 1 cup milk (whole, almond, or oat)
- 1/2 cup vegetable oil
- 1 cup crushed Oreos (plus extra for topping)
Instructions
- Preheat your oven to 350°F (175°C).
- In a large mixing bowl, sift together flour, cocoa powder, baking powder, baking soda, and sugar.
- In another bowl, whisk together eggs, milk, and vegetable oil until fully combined.
- Gently fold the wet ingredients into the dry mixture until just combined.
- Fold in crushed Oreos carefully.
- Line a muffin tin with paper liners and fill each cup three-quarters full.
- Top each muffin with extra Oreo pieces.
- Bake for 18-20 minutes or until a toothpick comes out clean.
- Allow to cool before serving.
Notes
For a healthier option, try substituting Greek yogurt for oil or milk. You can also use almond flour for a gluten-free version.
- Prep Time: 15 minutes
- Cook Time: 20 minutes
- Category: Breakfast
- Method: Baking
- Cuisine: American
- Diet: Vegetarian