The first time I tried my hand at making Chocolate Thumbprint Cookies, I was really just trying to impress my family with something sweet after dinner. It was a chilly evening in Asheville, the kind that nudges you to cozy up with a cup of hot tea and something delightful to munch on. The aroma of melting chocolate and the crackling of the oven brought back memories of my grandmother’s kitchen—a place that was always filled with warmth, laughter, and a sprinkle of mischief. I remember how she would lean over her mixing bowl, her wisdom inflected with the joy of sharing recipes that had been handed down through generations.
As I rolled the dough into little balls, my heart danced at the thought of my family gathering around the kitchen table. I could almost hear their laughter blending with the soft chiming of Christmas bells, even though we were far from that season. The most exciting part was the center dip, where I would nestle glimmers of rich chocolate ganache. As they baked, I peered through the oven window, the cookies showing off their little cracks, just like the fond memories etched in my mind. When they finally emerged—warm, glossy, and oh-so-tempting, I knew I’d found something special. Chocolate Thumbprint Cookies, with their blend of textures and flavors, became an instant family favorite, a little piece of joy that I now pass down to create smiles and sweet memories among my loved ones.
Flavor and Popularity
The Unique Flavor Profile of Chocolate Thumbprint Cookies
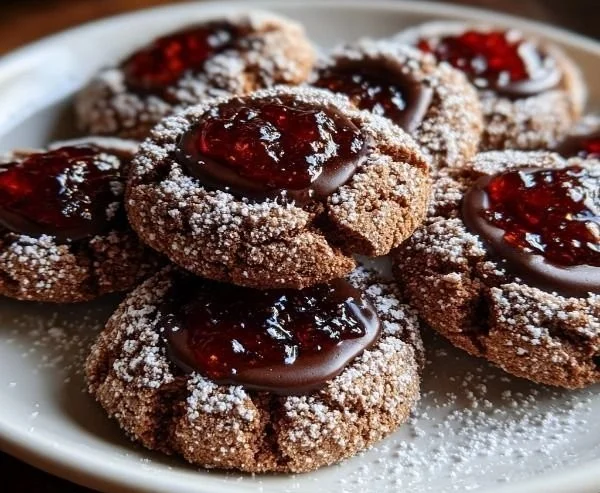
Chocolate Thumbprint Cookies are a delightful treat that juxtaposes rich chocolate with the subtle sweetness of buttery dough. The beauty of these cookies lies in their simplicity, where each ingredient shines without overshadowing the others. When you take a bite, the flavors weave together a symphony on your palate—the beloved nuttiness of the butter, the hint of salt that elevates the sweetness, and then that intense, velvety chocolate that melts harmoniously into your mouth.
What sets Chocolate Thumbprint Cookies apart is the texture. The exterior offers a slight crispiness, giving way to a chewy center that practically begs you to take another bite. Plus, you can fill the thumbprint with anything from silky chocolate ganache to fruity jams or even creamy peanut butter. This versatility not only allows you to get creative but also caters to myriad taste preferences, making these cookies a popular choice for gatherings. Whether it’s a cozy family evening or a festive holiday party, they’re the perfect sweet treat to delight each and every guest.
Why This Recipe Is a Family Favorite and Crowd-Pleaser
Chocolate Thumbprint Cookies hold a special place in my heart and in my family’s traditions. The process of making these cookies becomes a cherished event, turning an ordinary day into something extraordinary. Children love to help create the little dips, joyfully splattering chocolate everywhere but the cookies (and let’s be honest, that’s half the fun). When they are ready, there’s an undeniable excitement that fills the air—almost like waiting for the first snow of winter.
These cookies are wonderfully adaptable, perfect for any occasion. They carry a sense of nostalgia as we share stories from days gone by and pass around plates filled with these delightful gems. Each cookie stands as a testament to the love and warmth that comes from being together, making them a true crowd-pleaser. Trust me when I say—once you serve these to friends or family, you’ll be met with beaming smiles and requests for the recipe.
Ingredients and Preparation
Essential Ingredients and Possible Substitutions
Creating Chocolate Thumbprint Cookies requires just a handful of ingredients—most of which you may already have in your pantry. Here’s what you’ll want to gather:
- Butter: This creamy base infuses your cookies with rich flavor.
- Sugar: Granulated sugar helps create a delicate texture.
- Brown Sugar: Packed brown sugar gives a caramel-like flavor to the dough.
- All-Purpose Flour: Provides the structure for your cookies.
- Cocoa Powder: Choose high-quality unsweetened cocoa for that decadent chocolate taste.
- Egg Yolk: Just the yolk ensures a moist center.
- Vanilla Extract: A splash adds warmth and sweetness.
- Chocolate (for filling): You can choose dark, milk, or even white chocolate, depending on your preference.
Don’t worry if you need to make substitutions! You could easily use coconut oil in place of butter for a dairy-free version. For a gluten-free twist, almond flour or gluten-free all-purpose flour can work beautifully as well. And if you’re feeling adventurous, add a little espresso powder to amplify that chocolate goodness.
Step-by-Step Recipe Instructions with Tips
Making Chocolate Thumbprint Cookies is an enjoyable process that’s easy to follow. Here’s how to do it:
-
Preheat the oven: Start by preheating your oven to 350°F (175°C). This ensures that your cookies bake evenly.
-
Cream the butter and sugars: In a mixing bowl, cream together the softened butter, granulated sugar, and brown sugar until fluffy. This step takes about 2-3 minutes and is crucial for developing that airy texture.
-
Add the egg yolk and vanilla: Mix in the egg yolk and vanilla extract, combining thoroughly for a well-blended dough.
-
Incorporate the dry ingredients: Gradually add the sifted flour and cocoa powder, mixing just until combined. Be careful not to overmix—just like with our memories, we want the flavors to come together smoothly.
-
Shape the cookies: Roll the dough into tablespoon-sized balls. Place them on a parchment-lined baking sheet, spacing them about 2 inches apart. Using your thumb or the back of a measuring spoon, create an indentation in the center of each ball.
-
Fill the centers: At this point, you can fill the indents with your choice of chocolate ganache or jam. If using ganache, it’s best to let it cool to a thick consistency before filling.
-
Bake: Slide the baking sheet into the oven and bake for 12-15 minutes, until the edges are set. They may look slightly underbaked in the center, but they’ll continue to firm up as they cool.
-
Cool: Allow the cookies to cool on the baking sheet for a few minutes before transferring them to a wire rack to cool completely.
-
Enjoy: Once cooled, serve them with a cup of tea or coffee, and enjoy the fruits of your labor with family and friends!
Cooking Techniques and Tips
How to Cook Chocolate Thumbprint Cookies Perfectly
To achieve the perfect Chocolate Thumbprint Cookies, don’t rush through the steps. Creaming the butter and sugars well allows for that delightful texture we love. Additionally, always sift the flour and cocoa powder together to ensure a smooth, lump-free dough. This small tip can make a world of difference!
When it comes to filling the cookies, be generous! The center should have enough chocolate or jam so that each bite is a perfect mix of flavors. If you’re using chocolate ganache, consider preparing it first and allowing it to cool and thicken while you make the dough. This step helps maintain its beautiful shape when baked.
Common Mistakes to Avoid
One common mistake many people make is overbaking the cookies. These treats should have a soft center with a slight chew. Keep an eye on them toward the end of the baking time, and remember: they will continue to cook as they cool. Also, avoid using cold butter— room temperature butter emulsifies better within the dough, creating a lighter texture.
Lastly, don’t skip the cooling time before you dig in! I know it’s hard to wait, but allowing them to rest lets the flavors meld beautifully, truly honoring the love and effort you’ve put into making them.
Health Benefits and Serving Suggestions
Nutritional Value of Chocolate Thumbprint Cookies
While Chocolate Thumbprint Cookies are undoubtedly a treat, they do contain valuable ingredients that can offer some nutritional benefits. Cocoa powder, for instance, is rich in antioxidants, and when used in moderation, it can contribute to heart health. The use of butter provides essential fatty acids, which play a role in energy production.
That said, remember that treats like these are best enjoyed in moderation. A mindful approach to indulgence can help you appreciate each cookie while still enjoying their sweet charms.
Best Ways to Serve and Pair This Dish
Serve these delightful cookies fresh from the oven or after they’ve cooled, alongside a lovely cup of tea or coffee. They also pair exceptionally well with a scoop of vanilla ice cream for a decadent dessert. For that touch of elegance, consider dusting the cookies with a sprinkle of powdered sugar or drizzling some melted chocolate over the top.
These cookies also shine at gatherings and parties. A beautiful platter lined with Chocolate Thumbprint Cookies, perhaps alongside other treats, will provide a charming spread that invites people to share in the joy. You could even mix and match fillings for variety, offering something for everyone’s tastes.
FAQ Section
What type of mushrooms are best for Chocolate Thumbprint Cookies?
While the recipe doesn’t typically include mushrooms, if you’re feeling adventurous, consider incorporating mushroom powder for an umami twist in the chocolate! Surprisingly, grounded porcini or shiitake can add a unique depth, although it’s quite unconventional.
Can I use dried garlic instead of fresh?
In general, garlic doesn’t come into play within the dough or traditional recipes for Chocolate Thumbprint Cookies. However, if you aim for savory variations, dried herbs can certainly lend unique flavors, but fresh herbs are often preferred for their brightness.
How do I store leftover Chocolate Thumbprint Cookies?
Once cooled completely, store the cookies in an airtight container at room temperature. They’ll keep well for up to a week, although, trust me, they rarely last that long in my house!
Can I freeze Chocolate Thumbprint Cookies?
Absolutely! You can freeze both the dough and the baked cookies. For the dough, roll it into balls, place them on a baking sheet lined with parchment, freeze until firm, and then store in a zip-top freezer bag. When you’re ready to bake, simply add a minute or two to the baking time. If freezing baked cookies, ensure they cool completely before transferring them to a freezer-safe container.
Conclusion
If you’re like me, the kitchen is a sacred space filled with memories, laughter, and, of course, delicious aromas wafting through the air. Chocolate Thumbprint Cookies capture everything I cherish about cooking for my family: they are sweet, comforting, and rich with stories to share. There’s something magical about baking—especially when it transforms simple ingredients into a delightful treat that warms the heart.
So, trust me, you’ll want to make this recipe again and again. It not only nourishes the body but enriches your family’s history, one chocolate-packed cookie at a time. Gather your ingredients, invite some loved ones into the kitchen, and make some memories!
Print
Chocolate Thumbprint Cookies
Delightful cookies with rich chocolate and a chewy center, perfect for cozy gatherings.
- Total Time: 30 minutes
- Yield: 24 cookies
Ingredients
- 1 cup unsalted butter
- 1 cup granulated sugar
- 1 cup packed brown sugar
- 2 cups all-purpose flour
- ¾ cup unsweetened cocoa powder
- 1 egg yolk
- 1 teaspoon vanilla extract
- Chocolate for filling (dark, milk, or white)
Instructions
- Preheat the oven to 350°F (175°C).
- Cream together the softened butter, granulated sugar, and brown sugar until fluffy.
- Mix in the egg yolk and vanilla extract.
- Gradually add the sifted flour and cocoa powder, mixing just until combined.
- Roll the dough into tablespoon-sized balls and place them on a lined baking sheet.
- Create an indentation in the center of each ball.
- Fill the indents with chocolate ganache or jam.
- Bake for 12-15 minutes until edges are set.
- Cool on the baking sheet for a few minutes before transferring to a wire rack.
- Serve and enjoy!
Notes
Feel free to substitute coconut oil for a dairy-free version or use gluten-free flour for a gluten-free option.
- Prep Time: 15 minutes
- Cook Time: 15 minutes
- Category: Dessert
- Method: Baking
- Cuisine: American
- Diet: Vegetarian