The scent of baking always brings me back to my grandmother’s cozy kitchen in Asheville, especially around the holidays. One of my fondest memories is helping her make those delicious Christmas Kitchen Sink Cookies, a delightful concoction of everything sweet and festive that we could find. We’d pull out every jar of nuts, chocolate chips, and dried fruit we had, tossing them into the mixing bowl like we were creating our own secret treasure. The anticipation built as the cookies baked, their aroma enveloping us like a warm hug, promising a taste that was both comforting and joyful.
I can still remember how she would giggle every time I snuck a taste of the dough, our shared laughter mixing with the sounds of holiday music playing softly in the background. Those Christmas Kitchen Sink Cookies became an annual tradition, a sweet reminder of the love poured into every batch, as well as the connection we shared over the simple act of baking. Today, I want to share this cherished recipe with you, so you can create your own memories and add a joyful twist to your holiday festivities.
Flavor and Popularity
The Unique Flavor Profile of Christmas Kitchen Sink Cookies
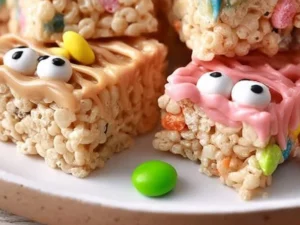
Christmas Kitchen Sink Cookies are a tapestry of flavors and textures—crunchy, chewy, and utterly delightful. Imagine biting into a cookie with a crisp edge and a soft, buttery center. The medley of chocolate chips, butterscotch morsels, crunchy nuts, and dried fruits creates an explosion of flavors in your mouth. Each bite is like a mini celebration, reminiscent of holiday gatherings filled with laughter, joy, and love.
What sets these cookies apart from the traditional chocolate chip variety is their versatility. You can experiment with various ingredients, making each batch uniquely yours. Add a sprinkle of sea salt for a savory contrast, or fold in a dash of cinnamon for that warm holiday feel. Their adaptability means you can feature seasonal favorites like cranberries and pecans, which perfectly capture the essence of Christmas.
Why This Recipe Is a Family Favorite and Crowd-Pleaser
These cookies have a way of disappearing faster than you can say “Merry Christmas.” Friends and family can’t resist their charm! They are the perfect addition to cookie platters or gift bags for neighbors. The joy of sharing these cookies brings folks together, fostering connections, just like my grandmother did when she shared her baking secrets with me.
The beauty of Christmas Kitchen Sink Cookies is their ability to evoke nostalgia. They remind us of joyful holidays spent with loved ones, creating moments that last a lifetime. This recipe invites everyone to join in on the fun, allowing kids and adults alike to mix and match their favorite ingredients. By the time you’re done baking, you’ll have delicious cookies to share and stories to tell around the holiday table.
Ingredients and Preparation
Essential Ingredients and Possible Substitutions
To whip up a batch of Christmas Kitchen Sink Cookies, you’ll need some essential ingredients. Here’s what you’ll gather for this delightful treat:
- Butter: Go for unsalted butter to control the saltiness.
- Brown Sugar: It adds a rich molasses flavor and moisture that gives the cookies their chewy texture.
- Granulated Sugar: This balances out the brown sugar.
- Eggs: They help bind the cookie dough and add richness.
- All-Purpose Flour: The backbone of the cookie; sifted for a lighter texture.
- Baking Soda: A leavening agent that creates a tender crumb.
- Vanilla Extract: For that sweet, aromatic essence.
- Salt: Just a pinch enhances all of the flavors.
- Mix-ins: Chocolate chips, nuts (like walnuts or pecans), dried fruits (cranberries or cherries), and possibly coconut flakes or oats.
Feel free to experiment with substitutions! For a lighter version, you could use applesauce for half of the butter. Almond flour or gluten-free flour can replace all-purpose flour for gluten-sensitive friends. If you don’t have brown sugar, substitute it with an equal amount of granulated sugar and a tablespoon of molasses for a similar flavor.
Step-by-Step Recipe Instructions with Tips
Now, let’s get into the fun part—making these cookies! Follow these simple steps:
-
Preheat your oven: Start by preheating it to 350°F (175°C). This ensures that your cookies bake evenly.
-
Cream the butter and sugars: In a large mixing bowl, cream together 1 cup of softened unsalted butter, 1 cup of brown sugar, and 1/2 cup of granulated sugar until light and fluffy.
-
Add the eggs and vanilla: Mix in 2 large eggs, one at a time, followed by 1 tablespoon of vanilla extract. Make sure everything is well combined.
-
Mix together dry ingredients: In a separate bowl, whisk together 2 1/2 cups of all-purpose flour, 1 teaspoon of baking soda, and a pinch of salt.
-
Combine wet and dry ingredients: Gradually add the dry mixture to the wet ingredients, stirring until just combined.
-
Fold in your mix-ins: This is where the fun begins! Stir in about 2 cups of your favorite mix-ins. You can use semi-sweet chocolate chips, white chocolate chips, chopped nuts, and dried fruit.
-
Scoop the dough: Using a cookie scoop or two tablespoons, drop mounds of dough onto a parchment-lined baking sheet, leaving space in between, as they spread while baking.
-
Bake: Place them in the preheated oven and bake for 10-12 minutes, or until the edges turn golden brown but the centers remain soft.
-
Cool and Enjoy: Let the cookies cool on the baking sheet for 5 minutes before transferring them to a wire rack to cool completely.
A little tip: For a chewier cookie, slightly underbake them—remove them from the oven when they’re just beginning to set.
Cooking Techniques and Tips
How to Cook Christmas Kitchen Sink Cookies Perfectly
Timing and temperature are essential when baking cookies. Always use room temperature butter for easier creaming and a smoother texture. A quality baking sheet helps too—if yours tends to warp, consider investing in a heavier one for even baking.
Also, make sure to use fresh ingredients; stale baking soda, for instance, can wreak havoc on that perfect rise. If you prefer uniform cookies, measure your dough with a scoop to keep them consistent in size.
Common Mistakes to Avoid
When baking, it’s easy to misstep. One common mistake is overmixing the dough, which can lead to tough cookies. Mix just until combined to keep that tender texture. Additionally, avoid skipping the cooling time on the baking sheets. As they sit, they continue to bake slightly from the residual heat, setting the edges without overcooking the centers.
Another tip: Don’t skip preheating the oven. It’s crucial for an even bake. If you throw them into a cold oven, you risk a flat cookie that doesn’t hold its shape.
Health Benefits and Serving Suggestions
Nutritional Value of Christmas Kitchen Sink Cookies
While cookies are often deemed a guilty pleasure, they can pack a bit of nutrition, too! The nuts add protein and healthy fats, while dried fruits bring fiber and vitamins along with natural sweetness. By swapping in oatmeal or dark chocolate, you can boost their health profile further, offering an indulgence that’s slightly more wholesome.
Best Ways to Serve and Pair This Dish
Serve these cookies warm from the oven with a cold glass of milk or a cup of hot cocoa. For a special touch, create a festive dessert platter alongside traditional treats like gingerbread men or peppermint bark. They make great gifts, especially when packaged in decorative tins adorned with cheerful ribbons.
You can also host a cookie decorating party, inviting friends and family to join in the fun, customizing their own cookies with icing, sprinkles, and various toppings.
FAQ Section
What type of mushrooms are best for Christmas Kitchen Sink Cookies?
While mushrooms might not traditionally belong in cookies, consider that the richness of certain flavors can be mirrored in various holiday dishes! Stick to sweet ingredients for your cookie batch, but don’t get discouraged—experimenting is all part of the joy of baking.
Can I use dried garlic instead of fresh?
For cookies, you’ll want to keep flavors sweet and enjoyable. Stick to sugars, chocolates, and nuts rather than garlic, which is best reserved for savory dishes.
How do I store leftover Christmas Kitchen Sink Cookies?
Once completely cooled, store leftover cookies in an airtight container at room temperature for up to a week. You can also freeze them in a single layer on a baking sheet, then transfer them to a Ziploc bag for up to three months.
Can I freeze Christmas Kitchen Sink Cookies?
Absolutely! Freezing the dough is the perfect way to prepare for a surprise bake-off. Scoop it into balls and freeze them on a baking sheet. Once frozen, transfer the cookie dough balls to a freezer bag. Bake from frozen, adding a couple of extra minutes to the baking time.
As I sit back and soak in the happiness that these Christmas Kitchen Sink Cookies bring, I can’t help but smile. They’re more than just cookies; they’re an invitation to create memories with family and friends. If you’re like me, you know that nothing fills the heart quite like a homemade treat shared with loved ones.
There’s something comforting about gathering in the kitchen, measuring out ingredients, and laughing as we experiment with flavors. Trust me, you’ll want to make these again and again, creating your own holiday traditions that will be cherished for years to come. So, grab your apron, gather the family, and let’s make some magic happen in the kitchen!
Print
Christmas Kitchen Sink Cookies
Delightful holiday cookies packed with flavors of chocolate, nuts, and dried fruits, perfect for sharing and creating memories.
- Total Time: 27 minutes
- Yield: 24 servings
Ingredients
- 1 cup unsalted butter, softened
- 1 cup brown sugar
- 1/2 cup granulated sugar
- 2 large eggs
- 1 tablespoon vanilla extract
- 2 1/2 cups all-purpose flour, sifted
- 1 teaspoon baking soda
- Pinch of salt
- 2 cups mix-ins (chocolate chips, nuts, dried fruits, etc.)
Instructions
- Preheat your oven to 350°F (175°C).
- Cream together the butter, brown sugar, and granulated sugar until light and fluffy.
- Add the eggs one at a time, followed by the vanilla extract, and mix until well combined.
- In a separate bowl, whisk together the flour, baking soda, and salt.
- Gradually add the dry mixture to the wet ingredients, stirring until just combined.
- Fold in your mix-ins.
- Scoop mounds of dough onto a parchment-lined baking sheet, leaving space in between.
- Bake for 10-12 minutes until the edges are golden brown but the centers remain soft.
- Let cool on the baking sheet for 5 minutes before transferring to a wire rack to cool completely.
Notes
For a chewier cookie, slightly underbake them. Use fresh ingredients for the best results.
- Prep Time: 15 minutes
- Cook Time: 12 minutes
- Category: Dessert
- Method: Baking
- Cuisine: American
- Diet: Vegetarian