As a child, the kitchen was my sanctuary—a place where the air was heavy with the aromas of baking sweetness and the soothing hum of family conversations. I remember the first time I tried making hazelnut brownies with my grandmother; her wise hands guiding mine as we mixed and stirred, creating a batter that smelled as rich and earthy as the mountains surrounding our home in Asheville. Each swirl of the spoon felt like magic. She would often tell me, “Baking is not just about the ingredients, Maggie; it’s about the love you put into it.” That day, we laughed, shared stories, and I made a sweet memory that still lingers in my heart.
The hazelnut brownies we baked were unlike any treat I had ever had. The heavenly chocolate melted delicately in my mouth, while the toasted hazelnuts added a delightful crunch and nutty flavor. I can still hear my grandmother’s laughter as we sneakily licked the bowl clean, delighting in the simple joy of our creation. These brownies became a family favorite—every holiday brought a new batch decorated with a dusting of powdered sugar, their aroma wafting through the air, beckoning everyone to gather ’round. Hazelnut brownies, rich and satisfying, remind me of love, warmth, and the joy of sharing something special with those I hold dear.
Flavor and Popularity
The Unique Flavor Profile of Hazelnut Brownies
Hazelnut brownies create a flavor experience like no other—a perfect balance of rich chocolate and nutty undertones. The beauty of these brownies lies in their complexity. Each bite offers a gooey chocolate center complimented by the subtle earthiness of hazelnuts. The slightly toasted hazelnuts bring out a buttery flavor that wonderfully contrasts with the deep, dark cocoa.
The texture is equally captivating. You’ve got the smooth, fudgy edge, and then—a little crunch from the hazelnuts. It’s as though you’re enjoying the best of both worlds. This harmony of flavors is what makes hazelnut brownies such a beloved treat; they don’t just satisfy your sweet tooth, they tell a story with every bite.
Why This Recipe Is a Family Favorite and Crowd-Pleaser
Whenever I whip up a batch of hazelnut brownies, the response is always one of delight. Whether I’m serving them at a family gathering or a cozy get-together with friends, they never fail to garner compliments. The nuttiness intrigues those who have had classic brownies, while the richness appeals to true chocolate lovers.
This dessert is unparalleled in popularity; it marries nostalgia with excitement. As guests bite into these fudgy treats adorned with a sprinkle of sea salt or a drizzle of chocolate ganache, their faces light up, reflecting the simple pleasure of indulgence. Hazelnut brownies serve as a testament to joyful gatherings—they are more than just food; they embody shared love and warmth.
Ingredients and Preparation
Essential Ingredients and Possible Substitutions
To make these delightful hazelnut brownies, gather the following essential ingredients:
- Unsalted Butter: Key for richness; opt for high-quality butter for the best flavor.
- Granulated Sugar: The sweetness balances the cocoa’s intensity.
- Brown Sugar: Adds moisture and depth with its caramel-like qualities.
- Large Eggs: Essential for binding everything together and creating that fudgy texture.
- All-Purpose Flour: A crucial component; it provides structure to the brownies.
- Cocoa Powder: Choose unsweetened cocoa for a rich chocolate flavor.
- Toasted Hazelnuts: The star ingredient that brings a roasted, nutty flavor.
- Vanilla Extract: Enhances the overall sweetness and aroma.
- Sea Salt: Highlights the sweet and chocolate notes beautifully.
And if you’re seeking variations, don’t fret! You can substitute the granulated sugar with coconut sugar for a healthier option or use almond flour for a gluten-free twist. Don’t have hazelnuts? Pecans or walnuts would beautifully complement the chocolate as well.
Step-by-Step Recipe Instructions with Tips
- Preheat Your Oven: Set it to 350°F (175°C) and line a 9×9-inch baking dish with parchment paper for easy removal.
- Melt the Butter: In a saucepan over low heat, melt the unsalted butter. Once it’s glossy and liquid, remove it from the heat and stir in both sugars. Mix until you get a smooth consistency.
- Add in Eggs: One at a time, beat in the eggs, making sure each one is well combined before adding the next. Stir in the vanilla extract for that delightful aroma.
- Combine Dry Ingredients: In a separate bowl, whisk flour, cocoa powder, and sea salt together. Gradually incorporate the dry mix into the wet mixture until just combined. Overmixing can lead to tough brownies, so be gentle!
- Fold in Hazelnuts: Carefully fold the toasted hazelnuts into the batter.
- Bake: Pour the batter into the prepared dish, spreading it into an even layer. Bake for 25-30 minutes or until a toothpick inserted comes out with a few moist crumbs.
- Cool: Let the brownies cool in the pan before lifting them out with the parchment paper. Slice and enjoy!
A tip: for an extra decadent touch, add chocolate chips or chunks to the batter before baking.
Cooking Techniques and Tips
How to Cook Hazelnut Brownies Perfectly
Perfecting the art of making hazelnut brownies is all about balance and timing. The key is to ensure the brownies are baked just right—oven temperatures can vary. Keep an eye on your treats during the last few minutes of baking; you want them set on the edges with a slightly gooey center for that fudgy texture everyone loves.
Using quality ingredients is crucial; the better your cocoa and chocolate, the more intense the flavor. Allowing the brownies to cool in the pan also helps enhance their texture. Patience is your friend in this process!
Common Mistakes to Avoid
When making hazelnut brownies, there are a few pitfalls to watch out for:
- Overmixing the Batter: This can lead to dense brownies instead of the desired fudginess. Mix just until the ingredients come together.
- Skipping the Cooling Time: Cutting into warm brownies can lead to a crumbly mess; let them cool properly for cleaner, neater slices.
- Not Toasting Hazelnuts: Toasting brings out the oils and flavor in nuts. It’s a crucial step, even if it adds a few extra minutes to the process.
Health Benefits and Serving Suggestions
Nutritional Value of Hazelnut Brownies
While these hazelnut brownies are undoubtedly a treat, they do boast some positive nutritional aspects. Hazelnuts are rich in healthy fats, vitamins, and minerals. They provide vitamin E and good amounts of magnesium, copper, and manganese, contributing to heart health and overall wellness.
Of course, moderation is key. These brownies are a delicious indulgence, but if you enjoy them alongside fresh fruit or a scoop of vanilla ice cream, they become an even more balanced treat.
Best Ways to Serve and Pair This Dish
To serve hazelnut brownies, consider a few delightful options. A light dusting of powdered sugar adds elegance, while serving them warm with a scoop of vanilla ice cream offers pure bliss. For a bit of flair, drizzle melted chocolate or caramel sauce on top—it’s the finishing touch that takes them over the top!
Pair them with a rich coffee or an herbal tea for a cozy afternoon treat, or share them with friends over a glass of red wine. Each bite is an invitation to savor the moment.
FAQ Section
What type of mushrooms are best for Hazelnut Brownies?
While mushrooms aren’t a traditional ingredient in hazelnut brownies, their umami flavor can add depth to savory dishes. Opt for meaty varieties like portobello or shiitake if you’re considering a savory twist elsewhere.
Can I use dried garlic instead of fresh?
In the context of hazelnut brownies, garlic isn’t an ingredient. However, generally speaking, dried garlic can be used in recipes to replace fresh garlic, but remember, the flavor will be stronger, so use it sparingly.
How do I store leftover Hazelnut Brownies?
To keep your brownies fresh, wrap them in plastic wrap or store them in an airtight container at room temperature for up to three days. A refrigerator can extend their shelf life, but they might dry out, so consider bringing them back to room temperature before enjoying.
Can I freeze Hazelnut Brownies?
Yes! Brownies freeze beautifully. Once completely cool, wrap them individually in plastic wrap and place them in a freezer-safe container. They can last up to three months. Thaw them overnight in the refrigerator before serving.
As I reminisce about the joy of baking those hazelnut brownies with my grandmother, I can’t help but feel that same excitement when I share this recipe with you. If you’re like me, and you find solace in the kitchen, you’ll appreciate just how therapeutic this process can be. There’s something comforting about creating something sweet to share with loved ones. Trust me, you’ll want to make these again and again. Enjoy the warmth and love that comes with each indulgent bite!
Print
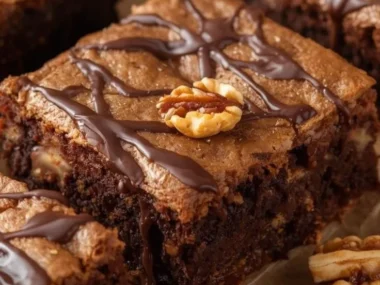
Hazelnut Brownies
Rich and fudgy hazelnut brownies with a delightful crunch and nutty flavor, perfect for sharing.
- Total Time: 45 minutes
- Yield: 16 servings
Ingredients
- 1/2 cup Unsalted Butter
- 1 cup Granulated Sugar
- 1/2 cup Brown Sugar
- 2 Large Eggs
- 1 cup All-Purpose Flour
- 1/2 cup Unsweetened Cocoa Powder
- 1 cup Toasted Hazelnuts
- 1 tsp Vanilla Extract
- 1/2 tsp Sea Salt
Instructions
- Preheat oven to 350°F (175°C) and line a 9×9-inch baking dish with parchment paper.
- Melt the butter in a saucepan over low heat. Stir in both sugars until smooth.
- Add eggs one at a time, mixing well, then stir in vanilla extract.
- In a separate bowl, whisk together flour, cocoa powder, and sea salt; gradually mix into the wet ingredients.
- Fold in the toasted hazelnuts.
- Pour batter into the prepared dish and spread evenly. Bake for 25-30 minutes. A toothpick should come out with a few moist crumbs.
- Allow to cool in the pan before lifting out and slicing.
Notes
For an extra decadent touch, consider adding chocolate chips or chunks to the batter before baking.
- Prep Time: 15 minutes
- Cook Time: 30 minutes
- Category: Dessert
- Method: Baking
- Cuisine: American
- Diet: Vegetarian