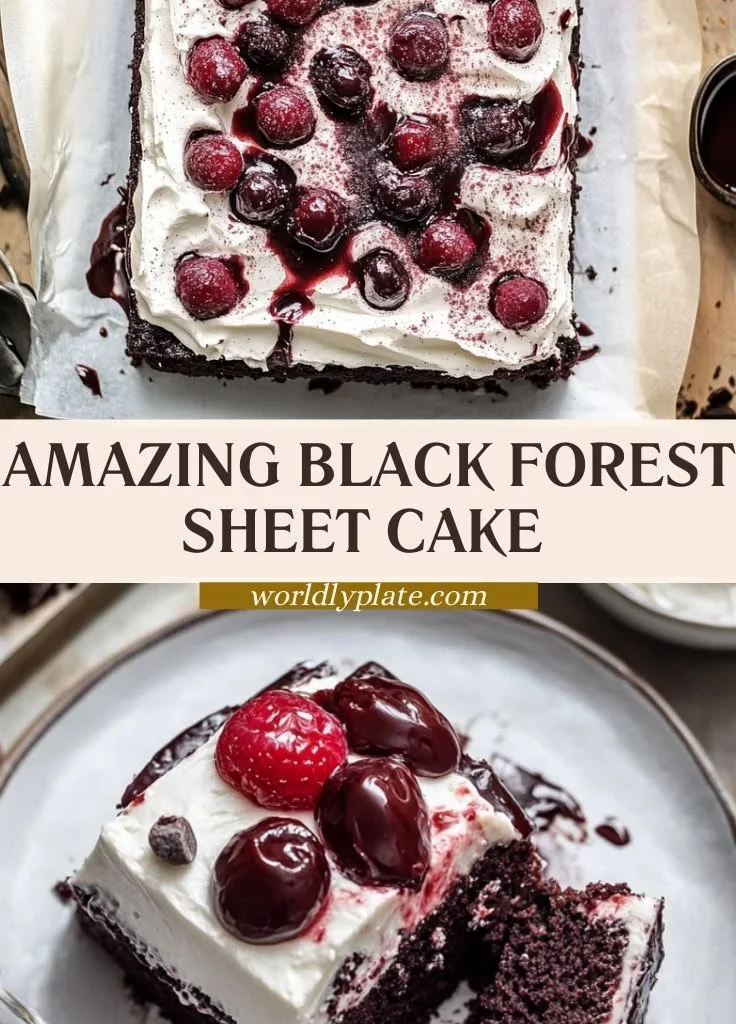
There’s a special kind of magic that fills the air when you step into a kitchen that has seen generations of love, laughter, and the sweet aroma of something baking. I remember the first time I encountered Black Forest Sheet Cake—a rich, chocolatey delight that seemed to sing to me from the oven. I was around ten years old, standing on my tiptoes, reaching for a taste while my grandmother whipped up her famous dessert that enveloped her kitchen in a warm embrace of cherry and chocolate. The sight of deep chocolate layers interspersed with glossy cherries and fluffy whipped cream felt like art, and from that moment forward, I was enchanted. It wasn’t just a cake; it was a celebration, a feast for the eyes and a treat for my young palate. Each slice told a story of family gatherings, laughter echoing through the halls, and joyous memories we created together.
As I grew older, I learned that making a Black Forest Sheet Cake wasn’t just about gathering ingredients; it was about crafting moments to share with those I loved. In my own home, it became a tradition—birthdays, holidays, or just a sunny afternoon—this cake found its way onto our table, delighting friends and family alike. Every bite retains that nostalgia, weaving together the threads of time spent and cherished. So today, I invite you to join me in baking this beloved cake, adding your chapter to the story that’s been unfolding since my grandmother’s time.
Flavor and Popularity
The Unique Flavor Profile of Black Forest Sheet Cake
There’s something undeniably alluring about the fusion of flavors in Black Forest Sheet Cake. It presents a perfect chorus of rich, velvety chocolate seamlessly married with tart, juicy cherries, creating a dessert that touches your heart in every bite. The chocolate sponge, moist and airy, plays a starring role, infused with just the right amount of sugar to elicit joy without overwhelming the palate. Paired with the cherries—whether fresh or plump, glistening in syrup—the combination strikes a delightful balance that dances on your taste buds.
A generous dollop of whipped cream crowns the cake, filling the air with an inviting sweetness that lingers long after the last bite. It’s playful yet sophisticated, the kind of cake that begs to be shared during holidays or family get-togethers. Each slice feels like a gift, transitioning effortlessly from a simple afternoon treat to a centerpiece at celebratory occasions.
This cake’s popularity isn’t just from its captivating taste; it’s also rooted in its ability to elicit smiles and spark joy. It serves as the ultimate conversation starter, encouraging laughter and stories as everyone gathers around the table to indulge. In a world moving fast, the tradition of sharing food—the heart of hospitality—remains timeless, and there’s no dessert better suited for this purpose than the Black Forest Sheet Cake.
Why This Recipe Is a Family Favorite and Crowd-Pleaser
Time and again, I find myself turning to this recipe whenever I need assurance that my baking will be a hit—pure comfort in a pan! What makes the Black Forest Sheet Cake rise to these occasions are familiar flavors everyone loves, blended in a way that sparks nostalgia and excitement. It seems to reach across generations, bringing together folks young and old, creating smiles that light up a room.
Every time I serve it, I’m met with anticipation, and as soon as that first slice is plated, a hush falls over the crowd, followed by joyous chatter as people dive in. I’ve seen faces light up as the first bites are taken, eyes closing in bliss as they savor those rich layers. It’s the kind of dessert that encourages you to savor each mouthful, lingering over the memories it brings. When friends ask for the recipe, I take it as the highest compliment—this cake has become a family staple that truly reflects the love and joy we share over food.
Ingredients and Preparation
Essential Ingredients and Possible Substitutions
To embark on your journey of crafting the perfect Black Forest Sheet Cake, gather the following essential ingredients:
Cake Base:
- All-purpose flour: The foundation of your cake, providing structure. If you need a gluten-free option, almond flour works beautifully as a substitute.
- Cocoa powder: For that deep chocolate flavor; opt for unsweetened for a richer taste.
- Baking powder and baking soda: These leavening agents give the cake its airy texture.
- Sugar: Granulated sugar lends sweetness, but brown sugar can add a lovely caramel undertone if you like.
- Eggs: They bind the cake, creating moisture. You can substitute with flax eggs for a vegan alternative.
- Milk: Whole milk adds creaminess; almond or oat milk are dairy-free choices.
- Vegetable oil: For keeping the cake moist. Melted coconut oil or melted butter can also work wonders.
Filling and Toppings:
- Cherries: Fresh or jarred, drizzled in syrup. If cherries aren’t available, dark sweet plums can make a delightful substitute.
- Whipped cream: Heavy cream whipped with sugar to create peaks is best. For a lighter touch, consider using Greek yogurt mixed with a bit of honey.
Step-by-Step Recipe Instructions with Tips
Now that you know what you need, let’s dive into the preparation of this glorious cake:
-
Preheat Your Oven: Set it to 350°F (175°C) so it’s ready as you mix your ingredients. A well-heated oven ensures even baking.
-
Mix Dry Ingredients: In a large mixing bowl, combine flour, cocoa powder, baking powder, baking soda, and sugar, whisking them to blend evenly.
-
Prepare Wet Ingredients: In another bowl, whisk together the eggs, milk, and vegetable oil until fully combined. This helps to enrich the cake with moisture.
-
Combine the Mixtures: Slowly pour the wet ingredients into the dry, mixing until just incorporated. Overmixing can result in a dense cake—aim for a few lumps to maintain that light texture.
-
Pour and Bake: Pour the batter into a greased sheet pan, spreading it evenly. Place it in the oven and bake for 30-35 minutes, or until a toothpick inserted into the center comes out clean.
-
Cool the Cake: Once baked, allow it to cool in the pan for about 10 minutes, then transfer it onto a wire rack to cool completely.
-
Add the Filling: After the cake has cooled, gently slice it in half horizontally. Layer cherries generously between the two cake halves, and then top with a thick layer of whipped cream.
-
Final Touch: Place the top layer back on, spreading an even layer of whipped cream over the top, garnishing with additional cherries for that beautiful finish.
-
Slice and Serve: Cut into squares, and serve it chilled or at room temperature. Enjoy that first slice with enthusiasm, because you deserve it!
Cooking Techniques and Tips
How to Cook Black Forest Sheet Cake Perfectly
Getting the right texture for your Black Forest Sheet Cake involves more than just following the recipe; it’s about paying attention to the sensory elements as you work. Make sure your ingredients are at room temperature before you start mixing, as it helps to achieve an even batter. Monitor your baking time closely—every oven is different, and pulling the cake out exactly when it’s done ensures that you won’t dry it out.
Another tip is to use high-quality cocoa powder; it can profoundly impact the cake’s flavor profile. A touch of espresso powder, if you’re up for it, can elevate the chocolate flavor even further, making it more decadent.
While you’re preparing your whipping cream, take care not to over-whip it. You want soft peaks that hold their shape without turning into butter. The beauty of whipped cream is its airiness, which balances the rich chocolate and fruity flavors perfectly.
Common Mistakes to Avoid
To ensure your Black Forest Sheet Cake is everything you dream of, here are common mistakes to steer clear of:
- Not using room-temperature ingredients: Cold eggs or milk can lead to uneven mixing.
- Overmixing the batter: This leads to a dense cake instead of that lovely, fluffy texture we’re after.
- Skipping the cooling stage: Patience is key. A warm cake may cause the whipped cream to melt, leading to a less-than-stellar presentation.
- Underestimating the cherry filling: Load those cherries; this dessert earns its name by being decadent!
Health Benefits and Serving Suggestions
Nutritional Value of Black Forest Sheet Cake
While Black Forest Sheet Cake is undoubtedly a treat, it’s a delightful balance of flavors, offering joy without being overly indulgent. The cake provides a source of carbohydrates, while the cherries contribute vitamins and antioxidants. Just remember, moderation is key when enjoying this beauty.
If you’re looking to bring in some extra nutrition, consider adding walnuts or almonds, which can not only enhance the flavor but also add healthy fats and protein. You can also use ricotta or a light cream cheese whipped cream instead of heavy cream for a lighter alternative.
Best Ways to Serve and Pair This Dish
Nothing complements a slice of Black Forest Sheet Cake quite like a good cup of coffee or a refreshing glass of milk. For a more festive touch, try serving with a scoop of vanilla ice cream or a drizzle of chocolate sauce.
You can also include a fresh fruit salad on the side, using seasonal fruits like strawberries and raspberries, to bring a tart freshness to the rich cake. A splash of prosecco or a light red wine can add a delightful aspect to the dessert experience, enhancing the flavors beautifully.
FAQ Section
What type of cherries are best for Black Forest Sheet Cake?
For the best flavor, opt for dark sweet cherries. Fresh cherries will offer the richest taste, but jarred cherries in syrup work excellently as well, providing that beautiful, sweet glaze.
Can I use dried garlic instead of fresh?
While dried garlic isn’t a typical ingredient in a Black Forest Sheet Cake, fresh ingredients provide a more vibrant flavor. That said, if you’d like to explore variations or different recipes in the future, dried garlic can work but adjust the quantity, as it’s more concentrated.
How do I store leftover Black Forest Sheet Cake?
To keep your cake fresh, cover it tightly with plastic wrap or store it in an airtight container in the refrigerator. It can last for up to 3-4 days, but trust me—it’s likely to be gone much sooner!
Can I freeze Black Forest Sheet Cake?
Absolutely! If you want to save some for later, slice the cake and wrap each piece in plastic wrap before placing it in a freezer-safe bag. It can last for about 2-3 months. Just thaw at room temperature when you’re ready to enjoy.
In closing, as you prepare your very own Black Forest Sheet Cake, imagine the warmth it will bring to your table, much like it has for mine over the years. There’s something comforting about sharing a slice with loved ones—each bite speaks of tradition, love, and that sweet connection we have through food. If you’re like me and love a dessert that fulfills your heart as much as your palate, trust me, you’ll want to make this again and again. Many joyous moments await you when you create this delightful cake!
Print
Black Forest Sheet Cake
A rich chocolate sheet cake layered with cherries and whipped cream, perfect for celebrations and family gatherings.
- Total Time: 45 minutes
- Yield: 12 servings
Ingredients
- 1 ¾ cups all-purpose flour
- ¾ cup unsweetened cocoa powder
- 1 ½ teaspoons baking powder
- 1 teaspoon baking soda
- 1 cup granulated sugar
- 2 large eggs
- 1 cup whole milk
- ½ cup vegetable oil
- 1 ½ cups cherries (fresh or jarred)
- 2 cups heavy cream
- ½ cup powdered sugar
Instructions
- Preheat your oven to 350°F (175°C).
- Mix the dry ingredients: flour, cocoa powder, baking powder, baking soda, and sugar in a large bowl.
- Whisk together the eggs, milk, and vegetable oil in another bowl.
- Combine the wet and dry ingredients until just incorporated.
- Pour the batter into a greased sheet pan and bake for 30-35 minutes.
- Cool the cake in the pan for 10 minutes before transferring to a wire rack.
- Slice the cooled cake in half horizontally and layer cherries between the halves.
- Top with whipped cream and garnish with more cherries.
- Serve chilled or at room temperature.
Notes
Use room temperature ingredients for even mixing. Monitor baking time closely to avoid overbaking.
- Prep Time: 15 minutes
- Cook Time: 30 minutes
- Category: Dessert
- Method: Baking
- Cuisine: German
- Diet: Vegetarian