I still remember the first time I made Oreo Balls in my cozy kitchen in Asheville. It feels like just yesterday, but it was a whole decade ago! As my granddaughter, Ellie, danced around my feet, begging to help, we rummaged through the pantry searching for everything we would need. The excitement in the air was palpable; nothing could compare to the joy of creating a sweet treat that everyone loved. Once I pulled out a package of classic Oreos, Ellie’s eyes sparkled with delight.
It was a whirlwind of crumbs and laughter as we pulverized those rich cookies into a fine powder—an activity she took very seriously, waving her tiny arms in satisfaction. The moment we mixed the crushed Oreos with cream cheese, the rich, velvety batter transformed into something decadent and irresistible. Rolling each ball in chocolate and then drizzling white chocolate on top felt like we were crafting edible jewels rather than mere desserts. As we plated our colorful creations, I couldn’t help but feel my grandmother’s spirit smiling down at us, reminding me that food binds us together just as much as love and laughter do. That day, Oreo Balls became not just a recipe in my collection, but a fond memory we cherish—sweet bites of childhood joy I hope to pass down through generations.
Flavor and Popularity
The Unique Flavor Profile of Oreo Balls
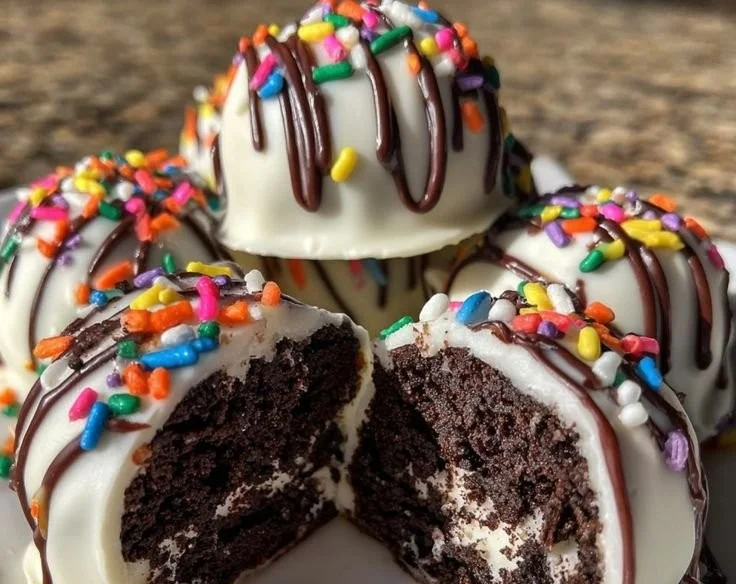
Oreo Balls possess a distinct flavor profile that captures the essence of indulgence. The combination of rich chocolatey Oreos and smooth cream cheese creates a luscious, fudgy texture that melts in your mouth. This delightful treat strikes a perfect balance between sweet and slightly tangy, and every bite feels like a hug from an old friend. The outer chocolate coating adds a satisfying crunch, while the inner filling gives you that comforting familiarity we all crave in a dessert.
Adding a hint of vanilla extract enhances the overall flavor and elevates its lusciousness. And when you mix in some colorful sprinkles or drizzle white chocolate on top, these Oreo Balls become just as much a feast for the eyes as they are for the palate. This perfect blend of textures and tastes makes Oreo Balls a loved treat at any gathering, whether it’s a festive holiday party or a casual backyard barbecue.
Why This Recipe Is a Family Favorite and Crowd-Pleaser
The warmth and love that come with making Oreo Balls contribute to their strong desirability—and I can guarantee they’ll hold a special place in your heart too! What I adore about this recipe is its simplicity; you don’t need to be a culinary whiz to whip up these treats. Everyone in the family can participate, just like Ellie did with me, which adds a layer of joy to the experience.
Oreo Balls are versatile, too! They adapt seamlessly to any celebration. From birthdays to potlucks, these treats disappear quickly, garnering a chorus of oohs and aahs. The sweet aroma evokes nostalgia, reminding us of childhood sweets and carefree days. Every time I serve them, it’s like unlocking cherished memories, and I find myself surrounded by some of the people I love most. When it comes to sweets that bring smiles, these delightful orbs of joy are hard to beat!
Ingredients and Preparation
Essential Ingredients and Possible Substitutions
To prepare your own delicious Oreo Balls, here’s a list of essential ingredients you’ll need:
- Oreos: The star of our show! I always choose classic Oreos, but feel free to experiment with other flavors if you’re feeling adventurous.
- Cream cheese: This is what brings the cookie crumbs together into a smooth, creamy mixture. You can substitute with a dairy-free cream cheese if you’re looking for a vegan twist!
- Chocolate coating: Melting chocolate chips works best, but you can use almond bark or candy melts as an alternative.
- Optional toppings: Sprinkles, crushed nuts, or a drizzle of white chocolate for that added flair.
If you don’t have specific ingredients on hand, don’t fret! Use what you have available. Swap the Oreos for gluten-free cookies for an inclusive touch, or change up the chocolate coating to match your mood. The beauty of Oreo Balls lies not just in their flavor, but in their adaptability.
Step-by-Step Recipe Instructions with Tips
-
Crush the Oreos: Start by placing your Oreos in a food processor. Pulse them until you achieve fine crumbs—this should take about a minute or so. For those without a processor, simply place the Oreos in a resealable plastic bag and crush them with a rolling pin. It’s a fun, satisfying task!
-
Combine with Cream Cheese: In a bowl, mix the Oreo crumbs with softened cream cheese until fully combined. It should feel like a thick dough! Don’t be afraid to use your hands to knead the mixture together for a homely touch.
-
Chill the Mixture: Cover the bowl with plastic wrap and refrigerate for about 30 minutes. Chilling will make rolling the balls easier and prevent them from falling apart later on.
-
Roll into Balls: Once chilled, scoop out a tablespoon of the mixture and roll it into a ball using your palms. Repeat until you’ve used up all the dough, placing the rolled balls on a parchment-lined baking sheet.
-
Melt the Chocolate: While the balls are chilling, melt your chocolate of choice in a microwave-safe bowl. Heat it in 30-second intervals, stirring in between until smooth and fully melted.
-
Coat Your Balls: Carefully dip each Oreo ball into the melted chocolate, allowing the excess to drip off. Place them back on the parchment paper and repeat until everything is coated.
-
Add Toppings: If you want to jazz them up a bit, sprinkle crushed nuts or drizzle white chocolate on top before the chocolate coating hardens.
-
Chill Again: Place the tray back into the refrigerator to let the chocolate set, which should take about 15 minutes.
-
Serve and Enjoy: Once set, serve your delectable Oreo Balls! If there are any leftovers (which is rare!), store them in an airtight container in the fridge.
Cooking Techniques and Tips
How to Cook Oreo Balls Perfectly
Cooking Oreo Balls is less about the heat and more about the preparation and assembly. The key is to ensure that you have a good balance of Oreo crumbs and cream cheese in the mixture. If you find the dough is too sticky, add a touch more crushed Oreos, or if it feels too dry, mix in just a smidgen of cream cheese.
Dipping them in chocolate can be tricky. Make sure the chocolate is fully melted, as this will create a smooth coating. A fork works beautifully for this; just dip the ball in, poking it through with the fork to keep it steady while shaking off excess chocolate.
Common Mistakes to Avoid
As you embark on your Oreo Ball-making journey, keep these common pitfalls in mind. Firstly, don’t skip chilling the dough after mixing the ingredients—this step firmly binds everything together. Also, work quickly when coating the balls, as chocolate can harden faster than anticipated.
Lastly, don’t hesitate to have fun! If you let your creativity shine through the toppings and flavor variations, you’ll end up with delicious morsels that are uniquely yours.
Health Benefits and Serving Suggestions
Nutritional Value of Oreo Balls
While Oreo Balls aren’t exactly health food, they can be part of a balanced indulgence every now and then! Each ingredient contributes its own nutritional value, especially if you consider using alternatives. For instance, opting for low-fat cream cheese can cut calories while still keeping the creamy texture. If you use dark chocolate for the coating, you can also benefit from the antioxidant properties.
Best Ways to Serve and Pair This Dish
Nothing beats serving Oreo Balls chilled on a tray, beautifully arranged with a mix of colorful toppings. Pair them with a glass of milk or coffee to create a delightful dessert experience. They also make perfect gifts wrapped in individual boxes, adding that personal touch.
Keep in mind that Oreo Balls pair well with fresh berries or fruit salads, providing a refreshing contrast to their richness. Whether you enjoy them alone or share them with loved ones, these treats never go out of style!
FAQ Section
What type of mushrooms are best for Oreo Balls?
Mushrooms don’t belong in Oreo Balls; they are a sweet dessert! Stick to the classic Oreo cookies for that indulgent flavor.
Can I use dried garlic instead of fresh?
For this recipe, you won’t need garlic at all! Stick with sweet elements to keep those Oreo Balls delightful and dessert-focused.
How do I store leftover Oreo Balls?
To store leftover Oreo Balls, keep them in an airtight container in the refrigerator. They can last for up to a week, though they’re usually gone long before then!
Can I freeze Oreo Balls?
Absolutely! Oreo Balls freeze exceptionally well. Just layer them between parchment paper in an airtight container and store them for up to a month. When you’re ready to enjoy them, simply thaw them in the fridge or at room temperature.
Conclusion
If you’re like me, cookies hold a special place in your heart, and Oreo Balls are undoubtedly one of those treats that bring pure happiness. Each time you make them, you’ll create new memories while cherishing those from the past. There’s something comforting about molding the ingredients with love, knowing that you’re crafting something meaningful to share with others. Trust me, you’ll want to make this again and again, creating moments that last well beyond the final bite. So gather your loved ones, roll up your sleeves, and let’s get to making some Oreo Balls!
Print
Oreo Balls
A delicious and simple treat made from crushed Oreos and cream cheese, coated in chocolate, perfect for any celebration.
- Total Time: 45 minutes
- Yield: 20 servings
Ingredients
- 1 package classic Oreos
- 8 oz cream cheese, softened
- 2 cups chocolate chips (for coating)
- Optional toppings: sprinkles, crushed nuts, or white chocolate drizzle
Instructions
- Crush the Oreos in a food processor until fine crumbs form.
- Combine the Oreo crumbs with softened cream cheese until fully mixed.
- Chill the mixture for about 30 minutes in the refrigerator.
- Roll the mixture into balls and place on a parchment-lined baking sheet.
- Melt the chocolate in a microwave-safe bowl in 30-second increments until smooth.
- Coat each ball in chocolate and place back on the parchment paper.
- Add toppings like sprinkles or crushed nuts if desired.
- Chill again for about 15 minutes to let the chocolate set.
- Serve and enjoy your delightful Oreo Balls!
Notes
These treats can be adapted by using gluten-free cookies or different flavors of Oreos. They freeze well for up to a month.
- Prep Time: 15 minutes
- Cook Time: 0 minutes
- Category: Dessert
- Method: No bake
- Cuisine: American
- Diet: Vegetarian