As a child, I’ll never forget the first time I laid my eyes on Ice Cream Cone Cupcakes. I was visiting my cousin, Jessie, during one hot July afternoon in Asheville, North Carolina. The sun was blazing, and all I could think about was drowning in a cool treat. Jessie made us both sit on the porch, where she unveiled these whimsical creations. The moment I saw those fluffy cupcakes nestled inside crunchy cones, my heart sang! They looked just like they belonged at a summer carnival, brightly colored frosting piled high and adorned with sprinkles that sparkled like confetti.
I still remember the sweet aroma wafting up from the kitchen, mingling with the scent of grass and wildflowers. It was happiness captured in a morsel—something unique that combined the flavors of a classic cupcake with the nostalgia of an ice cream treat. The first bite was pure bliss: the buttery cake contrasted beautifully with the crispness of the cone, and the icing was fluffy, rich, and so delightfully sweet that I instantly wished it would never end. That day was more than just a sunny afternoon; it was a cherished memory of family and laughter. Little did I know I was tasting the beginning of a tradition that would soon find its way to my own home.
Flavor and Popularity
The Unique Flavor Profile of Ice Cream Cone Cupcakes
Ice Cream Cone Cupcakes are a delightful marriage of flavors and textures that celebrate the spirit of joy and creativity. Each bite packs an enchanting punch! The soft, moist cake—tenderly baked to perfection—pairs beautifully with the crispy, buttery cone. The sweetness of the frosting enhances the flavor profile, creating a delightful contrast that brings back childhood memories.
Whether you choose vanilla, chocolate, or a more adventurous flavor, Ice Cream Cone Cupcakes can be modified and enhanced to each person’s taste. Infusing your frosting with extracts like almond or lemon can take your creation to another level. Imagine elegant swirls of chocolate frosting on a red velvet cake nestled in a cone! The options are as limitless as your imagination, and that versatility is precisely what makes these cupcakes such a hit at birthday parties, family reunions, or summertime get-togethers.
Why This Recipe Is a Family Favorite and Crowd-Pleaser
What sets Ice Cream Cone Cupcakes apart from other desserts is their playful nature. There’s something inherently fun about holding a cupcake in a cone, and it unleashes the child within us. For my family, it’s not just a recipe; it’s a shared experience that brings everyone together. Whether we’re decorating them together in the kitchen or indulging as we watch a movie, every moment becomes an adventure.
These little treats are not only visually appealing but also incredibly easy to serve. No plates needed! Just grab a cone and enjoy. I’ve found they often spark conversations and ignite laughter, making them the perfect centerpiece for gatherings of all kinds. It’s a beautiful blend of food and fond memories, and you can bring that joy into your home simply by baking a batch.
Ingredients and Preparation
Essential Ingredients and Possible Substitutions
To create those delightful Ice Cream Cone Cupcakes, gather the following essential ingredients:
- All-purpose flour: The foundation of any cupcake; it gives structure.
- Granulated sugar: Sweetness that’s pivotal for moist texture.
- Baking powder: The leavening agent that ensures cupcakes rise beautifully.
- Salt: Just a pinch can enhance all the flavors.
- Unsalted butter: Richness that contributes to tenderness and flavor.
- Eggs: They bind the ingredients together while adding moisture.
- Vanilla extract: A must-have for that classic cupcake flavor.
- Milk: Adds extra moisture, keeping your cupcakes soft.
- Ice cream cones: The fun holder that makes this recipe unique!
- Frosting: Whether homemade or store-bought, it can elevate your creations.
If you’re looking for substitutions, don’t fret! You can easily swap all-purpose flour for gluten-free flour to accommodate dietary needs or replace granulated sugar with coconut sugar for a healthier twist. Almond milk works beautifully instead of regular milk, catering to lactose-free diets. The beauty lies in your creativity; adapt this recipe to suit your family’s preferences!
Step-by-Step Recipe Instructions with Tips
-
Preheat Your Oven: Set the oven to 350°F (175°C). Prepare the pan by placing your ice cream cones in a muffin tin, giving them a stable base to stand tall.
-
Make the Batter: In a mixing bowl, cream together softened butter and sugar until fluffy. Add eggs one at a time, ensuring each one blends in before the next. Mix in the vanilla. Gradually include flour, baking powder, and salt alternately with milk, starting and ending with flour.
-
Fill the Cones: Carefully spoon the batter into your ice cream cones, filling them about 2/3 full. Be ready; the fun part is next!
-
Bake: Place the cones in the preheated oven and bake for 20-25 minutes, or until a toothpick inserted into the center comes out clean.
-
Cool and Frost: Allow them to cool in the muffin tin for a few minutes before transferring them to a cooling rack. Once cool, it’s time for frosting! You can use a piping bag for beautiful swirls or simply spread it on with a knife.
-
Decorate: This is where you can let your personality shine! Add sprinkles, edible glitter, or even a cherry on top.
-
Chill and Serve: For an added touch, refrigerate your cupcakes for a brief time before serving. This will make the frosting set a little firmer.
Cooking Techniques and Tips
How to Cook Ice Cream Cone Cupcakes Perfectly
The key to perfect Ice Cream Cone Cupcakes is managing the batter’s texture and filling each cone appropriately. Make sure not to overmix your batter; you want it to be light and airy. As you fill the cones, take care not to overfill; leaving room allows them to rise without overflow. If you’re using multiple flavors, try layering them in the cones for a fun surprise!
Common Mistakes to Avoid
It’s easy to make small mistakes when creating these cupcakes, but knowing what to watch for can make all the difference. Overbaking can lead to dry cupcakes, while underbaking will leave you with gooey centers. Additionally, remember that once you add frosting, there’s a delicate balance to protect. Make sure the cupcakes are completely cool before adding frosting—this prevents melting and sogginess.
Health Benefits and Serving Suggestions
Nutritional Value of Ice Cream Cone Cupcakes
While Ice Cream Cone Cupcakes are not a health food per se, they can still be made with some nutritious elements. Using whole grain flour or adding ground oats can optimize their nutritional value. You can also experiment with reducing sugar or fat in the frosting to make it more health-conscious. Topped with fresh fruit, like berries or slices of banana, they can be a delightful and slightly healthier treat.
Best Ways to Serve and Pair This Dish
These delightful Ice Cream Cone Cupcakes shine at any gathering! Serve them alongside a scoop of ice cream to treat your guests to an indulgent experience. Pair with a refreshing lemonade or iced tea, and you have a complete summer feast. They make an enjoyable picnic treat, too; pack them up for a day in the sunshine!
FAQ Section
What type of mushrooms are best for Ice Cream Cone Cupcakes?
Since mushrooms are not typically a part of Ice Cream Cone Cupcakes, stick to the sweetness of cake and frosting! If you’re venturing into savory territory, you might use them in other recipes.
Can I use dried garlic instead of fresh?
Absolutely! While fresh is always more aromatic, dried garlic can add depth and a unique twist to savory dishes. However, be mindful of the potency; you’ll need less since dried is more concentrated.
How do I store leftover Ice Cream Cone Cupcakes?
To keep them fresh, store any leftovers in an airtight container at room temperature for up to three days. You can also refrigerate them for a longer shelf life, up to a week.
Can I freeze Ice Cream Cone Cupcakes?
Yes, you can freeze them! Just make sure they are completely cooled and then wrap them tightly in plastic wrap followed by aluminum foil. When you’re ready to enjoy, set them out to come back to room temperature.
Conclusion
If you’re like me, the joy and nostalgia of baking Ice Cream Cone Cupcakes can transform an ordinary day into something special. There’s something comforting about gathering in the kitchen, mixing ingredients, and the sweet anticipation of indulging in a simple dessert that beams happiness. So whether it’s a random Wednesday or a festive celebration, I encourage you to try this delightful recipe. Trust me, you’ll want to make this again and again. Every bite is a reminder of the good times, a sprinkle of fun, and the love that fills the air when you bake with family. Get started today, and let the cupcakes weave their magic into your home!
Print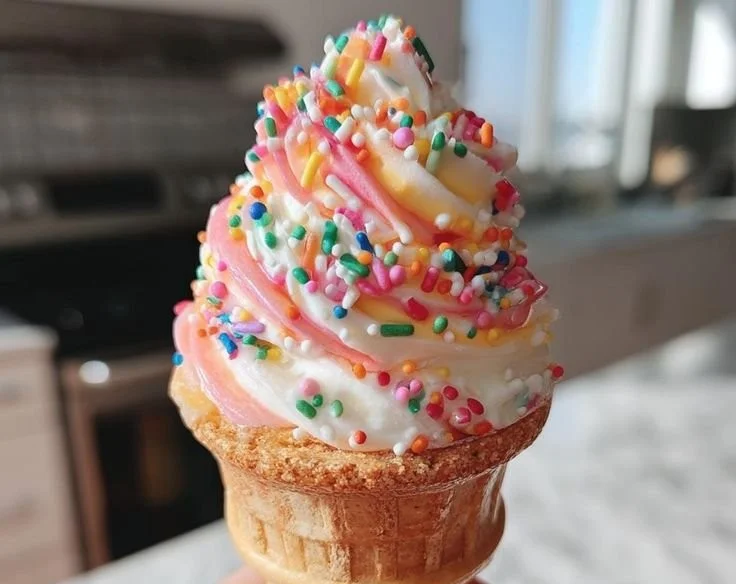
Ice Cream Cone Cupcakes
Delightful Ice Cream Cone Cupcakes blend fluffy cake and colorful frosting in crispy cones, perfect for summer gatherings.
- Total Time: 40 minutes
- Yield: 12 servings
Ingredients
- 1 ½ cups all-purpose flour
- 1 cup granulated sugar
- 1 ½ teaspoons baking powder
- ½ teaspoon salt
- ½ cup unsalted butter, softened
- 2 large eggs
- 1 teaspoon vanilla extract
- ½ cup milk
- 12 ice cream cones
- Frosting (homemade or store-bought)
Instructions
- Preheat the oven to 350°F (175°C) and place ice cream cones in a muffin tin.
- Cream together softened butter and sugar until fluffy.
- Add eggs one at a time, blending well after each addition.
- Mix in vanilla extract.
- Gradually include flour, baking powder, and salt alternately with milk, starting and ending with flour.
- Spoon the batter into ice cream cones, filling them about 2/3 full.
- Bake for 20-25 minutes, or until a toothpick comes out clean.
- Cool in the muffin tin for a few minutes before transferring to a cooling rack.
- Frost once cool, using a piping bag or knife.
- Decorate with sprinkles or a cherry on top.
- Chill in the refrigerator before serving for a firmer frosting.
Notes
For a twist, try using gluten-free flour or coconut sugar. Enhance frosting with extracts like almond or lemon.
- Prep Time: 15 minutes
- Cook Time: 25 minutes
- Category: Dessert
- Method: Baking
- Cuisine: American
- Diet: Vegetarian