Swirled Christmas Cookies fill my heart with sweet nostalgia, transporting me to the cozy kitchen of my childhood home in Asheville, North Carolina. I can still vividly remember the winter mornings when the aroma of baking cookies would waft through our house, mingling with the scents of pine and cinnamon from the freshly cut Christmas tree. My grandmother, with her flour-dusted apron and warm smile, would gather us around the kitchen table, her hands gracefully swirling colors into soft, buttery dough—an art that felt like magic to me. Those Swirled Christmas Cookies weren’t just treats; they were tokens of love, connections made during the bustling holiday season.
As the vibrant reds and greens twirled together, our laughter filled the air, creating a harmony as delightful as the melodies of classic Christmas carols playing in the background. Each cookie we formed was a little gift, a taste of those cherished moments spent in simple joy. Now, every time I make these cookies with my family, I feel that same warmth, that same enchantment. Together, we roll, cut, and decorate, crafting memories that intertwine with the buttery sweetness of the cookies. If you’re looking to create your own holiday magic, these Swirled Christmas Cookies are the perfect way to share that joy with your loved ones.
Flavor and Popularity
The Unique Flavor Profile of Swirled Christmas Cookies
Swirled Christmas Cookies offer a delightful combination of flavors that dance across your palate. The buttery base harmonizes beautifully with the sweet and slightly tangy notes from the holiday-inspired colors—often infused with vanilla or almond extracts that evoke festive cheer. Rich, creamy white frosting or colorful sprinkles elevate their visual appeal, making them as inviting to the eyes as they are to the taste buds.
Each bite brings notes of nostalgia, reminiscent of those early mornings in my grandmother’s kitchen. The balance of sweetness with a hint of complex flavor profiles creates an indulgent yet comforting experience, perfect for any holiday gathering. Enjoying these cookies alongside a warm cup of cocoa or spiced tea enhances the sensory delight, making for moments that linger long after the last crumb has vanished.
Why This Recipe Is a Family Favorite and Crowd-Pleaser
It’s no wonder that Swirled Christmas Cookies have become a beloved tradition in my family. Their visual appeal captures the attention of everyone, and trust me, there’s always a race to grab the first cookie. Kids light up as they choose their favorite swirl, and adults find themselves reaching for “just one more.”
These cookies perfectly complement the festive atmosphere of holiday celebrations and gatherings. Their bright colors and rich flavors invite sharing, sparking conversations and laughter. It’s these moments, surrounded by friends and family, that solidify why this recipe is a go-to for celebrations – they bring people together, evoking smiles and stories that echo the warmth of the season.
Ingredients and Preparation
Essential Ingredients and Possible Substitutions
To craft these memorable Swirled Christmas Cookies, gather the following essential ingredients:
- Butter: Use unsalted butter for control over the salty balance. Feel free to substitute with vegan butter for a dairy-free option.
- Granulated Sugar: This creates the base sweetness. Brown sugar can be used as a substitute for a deeper, caramelized flavor.
- Eggs: Large eggs bind the ingredients. If you’re looking for an egg-free version, consider applesauce or flaxseed meal as substitutes.
- All-Purpose Flour: Provides the structure. Gluten-free all-purpose flour works as an alternative for those avoiding gluten.
- Baking Powder: This ingredient helps the cookies rise, keeping them airy and light.
- Vanilla Extract: The aromatic touch that unites the flavors. Almond extract can be a delightful swap for a different flavor note.
- Food Coloring: This is what brings the magic! Gel food coloring offers a more vibrant hue than liquid, but either can work.
Gather these basics, and let’s get ready to create a little cookie magic!
Step-by-Step Recipe Instructions with Tips
-
Preheat Your Oven: Start by preheating your oven to 350°F (175°C). Preheating ensures that your cookies cook evenly.
-
Cream the Butter and Sugar: In a large bowl, cream together 1 cup of softened unsalted butter and 1 cup of granulated sugar until light and fluffy. This will take around 3-5 minutes. Don’t rush this step; it’s crucial for the cookie’s texture!
-
Add Eggs and Vanilla: Beat in two large eggs, one at a time, then mix in 2 teaspoons of vanilla extract. You want these ingredients well combined for a unified flavor.
-
Mix in the Dry Ingredients: In another bowl, whisk together 3 cups of all-purpose flour and 1 teaspoon of baking powder. Gradually add this to the wet mixture, mixing until a dough forms. It should be soft but not sticky.
-
Divide and Color: Once your dough is ready, separate it into two or three equal parts. Add a few drops of food coloring to each, kneading the color into the dough until vibrant and uniform.
-
Create the Swirl: Roll each color out into logs, then twist them together to form a single colorful log. Wrap it in plastic wrap and refrigerate for at least 30 minutes. This helps the cookies maintain their shape while baking.
-
Slice and Bake: Slice the chilled dough into about ¼-inch rounds and arrange them on a parchment-lined baking sheet. Bake for 10-12 minutes or until the edges are lightly golden.
-
Cool and Decorate: Allow the cookies to cool on the baking sheet for a few minutes before transferring them to a wire rack. Once fully cooled, decorate with frosting or sprinkles as desired to add personal flair!
Tips for Perfect Cookies
Don’t rush the chilling time! Letting the dough set in the fridge makes a world of difference in preventing spreading during baking.
If you’re using shaped cutters instead of slicing, simply roll out the dough into a uniform thickness and use festive cookie cutters for charming shapes.
Experiment with flavors by adding spices like nutmeg or cinnamon into the dough for an extra twist.
Cooking Techniques and Tips
How to Cook Swirled Christmas Cookies Perfectly
Achieving cookie perfection means understanding your oven. Every oven heats differently, so be sure to keep an eye on your batch. Rotate your baking sheets halfway through for even cooking to ensure every cookie comes out beautifully golden and delicious.
Additionally, investing in an oven thermometer can help monitor temperatures more accurately.
Lastly, resist the urge to overbake! The cookies will continue to firm up as they cool, leaving you with soft, chewy goodness that melts in your mouth.
Common Mistakes to Avoid
-
Overmixing the Dough: Mixing the dough too much can lead to tough cookies. Mix just until combined for a tender result.
-
Not Chilling the Dough: Skipping this vital step can result in flat cookies. Always allow time for chilling.
-
Sugar Substitution: While it’s tempting to reduce sugar for health reasons, cookies rely heavily on sugar for structure and flavor. Stick to the measurements for best results.
Health Benefits and Serving Suggestions
Nutritional Value of Swirled Christmas Cookies
While Swirled Christmas Cookies are primarily a delightful treat, they do offer some benefits in moderation. The butter provides energy, the sugar can be a quick fuel source, and eggs deliver some protein. Incorporating quality ingredients allows you to enjoy these cookies while keeping a sense of balance in your diet.
Best Ways to Serve and Pair This Dish
These cookies shine as a standalone treat but also pair beautifully with a steaming cup of tea or hot cocoa. Present them on a colorful platter for festive occasions, and consider pairing them with a charcuterie board featuring cheeses, fruits, and nuts.
For added indulgence, drizzle icing or melted chocolate on top for a decorative flourish while tantalizing your taste buds.
FAQ Section
What type of mushrooms are best for Swirled Christmas Cookies?
For the Swirled Christmas Cookies, mushrooms aren’t involved! However, if you’re curious about new flavors for savory dishes, earthier types like shiitake or cremini work wonders. Yet, if you’re asking about cookies, you’re in for a sweet surprise—no mushrooms here!
Can I use dried garlic instead of fresh?
Though garlic is a cherished ingredient in many recipes, it doesn’t belong in Swirled Christmas Cookies! Stick to flavors that complement the sweetness. Fresh or powdered vanilla will keep those holiday vibes strong.
How do I store leftover Swirled Christmas Cookies?
Keep your cookies fresh by storing them in an airtight container at room temperature. They can last for about a week, although they might disappear faster than you think!
Can I freeze Swirled Christmas Cookies?
Absolutely! Just make sure they’re fully cooled before placing them in an airtight container or freezer bag. They can be frozen for up to three months. When you’re ready, thaw them in the fridge overnight—just like a present waiting to be unwrapped!
Conclusion
If you’re like me, the holiday season brings a certain magic that shines brighter with the scents and tastes of home-baked goodies. Making Swirled Christmas Cookies invites that joy back into our kitchens, creating new memories while honoring the old. There’s something comforting about gathering loved ones while the oven warms your home with sweet aromas. Trust me, you’ll want to make this recipe again and again, not just for the cookies but for the stories and laughter they inspire. So roll up your sleeves, gather your loved ones, and let’s get baking—sweet memories await!
Print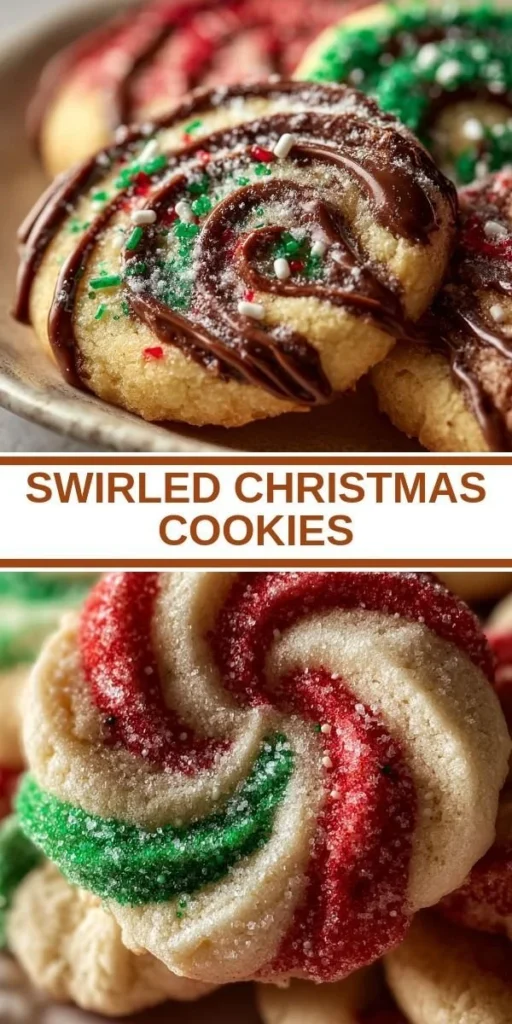
Swirled Christmas Cookies
Delightful Swirled Christmas Cookies evoke nostalgia with their vibrant colors and rich buttery flavor, making them perfect for holiday celebrations.
- Total Time: 60 minutes
- Yield: 24 cookies
Ingredients
- 1 cup unsalted butter, softened
- 1 cup granulated sugar
- 2 large eggs
- 2 teaspoons vanilla extract
- 3 cups all-purpose flour
- 1 teaspoon baking powder
- Food coloring (gel or liquid)
Instructions
- Preheat your oven to 350°F (175°C).
- Cream together the softened butter and granulated sugar until light and fluffy.
- Add eggs one at a time, mixing in vanilla extract.
- In a separate bowl, whisk together flour and baking powder, then gradually add to the wet mixture to form dough.
- Divide the dough into two or three parts and knead in food coloring.
- Roll the colored doughs into logs, twist them together, wrap in plastic wrap, and refrigerate for 30 minutes.
- Slice the chilled log into ¼-inch rounds and place on a parchment-lined baking sheet.
- Bake for 10-12 minutes until edges are lightly golden.
- Cool and decorate with frosting or sprinkles if desired.
Notes
Chill the dough to prevent spreading during baking. For fun shapes, use cookie cutters.
- Prep Time: 20 minutes
- Cook Time: 12 minutes
- Category: Dessert
- Method: Baking
- Cuisine: American
- Diet: Vegetarian