Snowman Cake Pops bring back such warm memories for me. I remember the first time I decided to whip up a batch with my granddaughter, Emma. It was a chilly December afternoon, too cold to wander outside, so we opted for an afternoon filled with laughter, melted chocolate, and a dash of frosting. As we rolled the cake into balls and dipped them into sweet white chocolate, I couldn’t help but feel the joy radiate through our little kitchen in Asheville. The excitement on her face as she decorated them with tiny sugar eyes and edible glitter was priceless. Those Snowman Cake Pops weren’t just desserts; they were a symbol of our time together, a reminder that cooking can be a celebration of life, warmth, and love.
Over the years, I’ve learned a thing or two about what makes a recipe resonate with people. When I think of Snowman Cake Pops, I think of the playful whimsy that they bring to any gathering. Whether you’re hosting a festive holiday party or simply want to spread a little joy among friends and family, these delightful treats will surely warm hearts and sweeten the day.
Table of Contents
Flavor and Popularity
The Unique Flavor Profile of Snowman Cake Pops
When you take a bite of a Snowman Cake Pop, you experience a wonderful journey of flavors. The essence begins with moist chocolate or vanilla cake, creating a soft and rich base. Coated in creamy white chocolate, the pops possess a delightful sweetness balanced by just a hint of buttery flavor. Sprinkles add a little crunch, and as you savor each bite, you find a comforting aroma reminiscent of holiday celebrations.
What I adore about these pops is their versatility. While the classic version is a hit, you can infuse them with flavors like peppermint or almond extract for that extra festive touch. You can even mix in crushed cookies for added texture. Each creation becomes more than just a treat; it transforms into a unique story of flavors, inviting the joy of the season into your kitchen.
Why This Recipe Is a Family Favorite and Crowd-Pleaser
Over the years, I’ve served Snowman Cake Pops at countless gatherings—birthdays, holiday parties, and family get-togethers. Without fail, these delightful treats always disappear faster than I can keep up with! Children and adults alike are drawn to their whimsical appearance, giggling with joy at the sight of these adorable snowy figures.
Not only are they a feast for the eyes, but they also encourage creativity—everyone can join in on decorating! Emma loves to get creative with her Snowman Cake Pops, experimenting with different colors and designs. There’s something heartwarming about seeing each family member add their personal touch, transforming cakes into little icing-clad snowmen that make for beautiful centerpieces.
Ingredients and Preparation
Essential Ingredients and Possible Substitutions
To make these Snowman Cake Pops, you’ll want to gather a few key ingredients. Here’s what you’ll need:
- Cake (chocolate or vanilla): Bake any preferred flavor; left over cake works beautifully here, just make sure it’s moist.
- Frosting: Use classic buttercream; it binds the cake perfectly.
- White chocolate: This will form the outer shell; feel free to use candy melts as an alternative.
- Decorations: Edible glitter, mini chocolate chips, or fondant for the features.
- Lollipop sticks: These will hold it all together.
As for substitutions, don’t worry! You could use cream cheese frosting for a tangy twist or even go for dark chocolate coating if you prefer something less sweet. And if you need to avoid gluten, there are plenty of delicious gluten-free cakes out there that will do just fine.
Step-by-Step Recipe Instructions with Tips
Bake the Cake: Start by baking your cake according to the package or recipe instructions. Once it cools, crumble it into a large bowl.
Mix with Frosting: Gradually add frosting to the crumbled cake until it holds together well. I usually go for about one cup of frosting per cake.
Form Balls: Using your hands, form the cake mixture into small balls (about one inch in diameter). Place them on a baking sheet lined with parchment paper.
Chill: For the pops to hold together better, refrigerate the balls for at least 30 minutes.
Melt White Chocolate: While the cake pops chill, melt your white chocolate in a bowl over simmering water or in a microwave, stirring until smooth.
Dip the Sticks: Dip one end of each lollipop stick into the melted chocolate before inserting it into a cake ball. This helps hold the stick in place.
Coat the Cake Balls: Carefully dip each chilled cake ball into the melted chocolate, allowing any excess to drip off. Then, place them back on the parchment paper.
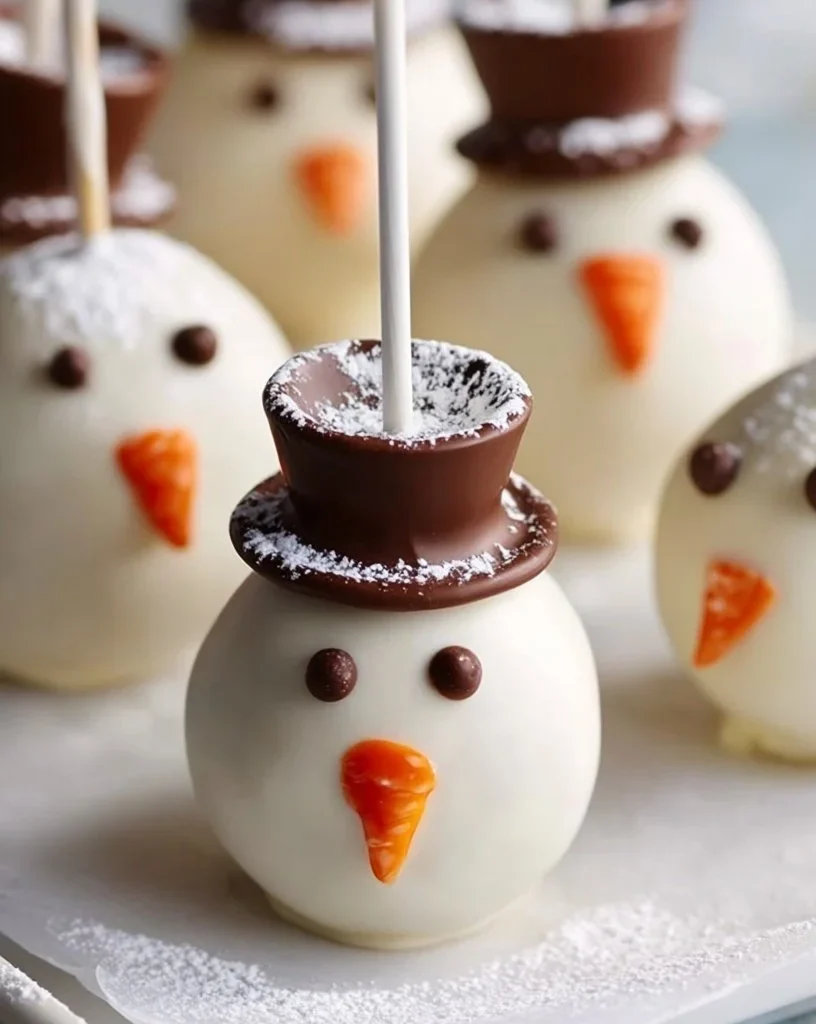
Decorate: While the coating is still wet, add your decorations. This is where the fun really begins! I love seeing what everyone comes up with!
Let Dry: Allow the pops to set completely—this usually takes about an hour in the refrigerator.
Serve and Enjoy: Once dry, display them in a cup or on a platter. I promise, you’ll adore the looks on the faces of those who get to enjoy them.
Cooking Techniques and Tips
How to Cook Snowman Cake Pops Perfectly
The key to perfect Snowman Cake Pops is in the details. Ensure that your cake is thoroughly crumbled, and be generous yet cautious with the frosting. Too much frosting can make them overly sweet. Also, keep an eye on the melting process for the chocolate; you want it warm but not too hot to ensure a smooth coating that doesn’t burn.
When dipping, let the excess chocolate fall off to avoid a thick, clumpy coat. Use a gentle swirling motion to get an even layer. Finally, patience is your best friend—chilling your pops ensures that they stay firm when decorating.
Common Mistakes to Avoid
One of the most common blunders in making these cake pops is skimping on chilling time. Your pops may fall apart if they aren’t cool enough when you dip them. Also, remember not to overheat the chocolate; burnt chocolate is a sad fate for this recipe!
Another hiccup could be using too much frosting—it can make it more of a mushy mess rather than firm balls. Finding that sweet spot with the cake and frosting ratio is essential to success.
Health Benefits and Serving Suggestions
Nutritional Value of Snowman Cake Pops
While Snowman Cake Pops are a delightful treat, they don’t offer major health benefits but can be enjoyed in moderation. You can make them a little healthier by using less frosting or a sugar-free cake mix. You can even be adventurous and incorporate whole grains for a twist!
With options for dairy-free chocolate or gluten-free ingredients, there’s a way to make every bite feel a bit lighter on the conscience.
Best Ways to Serve and Pair This Dish
These Snowman Cake Pops shine at festive gatherings. I often serve them on a large platter surrounded by twinkling lights or nestled among fresh pine branches for that added holiday spirit. They pair wonderfully with a warm cup of hot cocoa or festive spiced apple cider.
For a fun twist, why not serve them alongside an assortment of cookies or cupcakes? They can also be wrapped individually in cellophane as charming party favors for guests to take home!
FAQ Section
What type of chocolate is best for Snowman Cake Pops?
The best chocolate to use is white chocolate or candy melts for a sweet and creamy coating. Both provide a beautiful finish and are easy to work with.
Can I use dried garlic instead of fresh?
In the context of Snowman Cake Pops, garlic isn’t a traditional ingredient; however, if you ever find cake pops with a savory twist, fresh ingredients always yield better flavors than dried alternatives.
How do I store leftover Snowman Cake Pops?
Store any leftovers in an airtight container at room temperature or in the refrigerator. They’ll typically last a few days if properly stored.
Can I freeze Snowman Cake Pops?
Yes, you can freeze Snowman Cake Pops! Just ensure they’re in an airtight container and are well-wrapped. When you’re ready to enjoy them, let them thaw in the refrigerator overnight.
Conclusion
If you’re like me, you know that the kitchen is a special place for memories and flavors to mingle. Snowman Cake Pops are much more than a festive treat; they are a canvas for creativity and a way to bring loved ones together. There’s something comforting about creating little works of art that not only please the palate but also warm the heart.
Trust me, you’ll want to make these again and again—each holiday season, each family gathering, and every little celebration in between. So gather your loved ones, dive into this cozy recipe, and let the joy unfold in your home, one Snowman Cake Pop at a time!
Print
Snowman Cake Pops
Delightful and whimsical Snowman Cake Pops perfect for festive gatherings and family celebrations.
- Total Time: 45 minutes
- Yield: 24 cake pops
Ingredients
- Cake (chocolate or vanilla)
- Frosting (classic buttercream or cream cheese)
- White chocolate (or candy melts)
- Decorations (edible glitter, mini chocolate chips, fondant)
- Lollipop sticks
Instructions
- Bake the Cake: Prepare your cake according to package instructions. Once cooled, crumble into a large bowl.
- Mix with Frosting: Gradually mix in frosting until the mixture holds together.
- Form Balls: Shape the mixture into small balls, about one inch in diameter, and place on a lined baking sheet.
- Chill: Refrigerate the balls for at least 30 minutes.
- Melt White Chocolate: Melt white chocolate until smooth.
- Dip the Sticks: Dip lollipop sticks in the melted chocolate, then insert them into the cake balls.
- Coat the Cake Balls: Dip each ball in melted chocolate, letting excess drip off, then return to parchment.
- Decorate: While the coating is wet, add your chosen decorations.
- Let Dry: Allow to set completely in the refrigerator for about an hour.
- Serve and Enjoy: Display and serve your delightful creations!
Notes
Experiment with different flavors by adding peppermint or almond extract. Use gluten-free cakes if needed.
- Prep Time: 15 minutes
- Cook Time: 30 minutes
- Category: Dessert
- Method: Baking
- Cuisine: American
- Diet: Vegetarian